K+2P versus K+P - Protected passed pawn Part IV
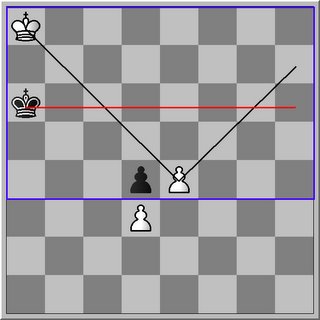
The same mechanism as with the Q- bishop pawn can be applied to the Q-center pawn. It is important to notice that a counterattack against white's rear pawn would lead to a lost Queen versus pawn ending.
Only when white's king is on the 8th rank black can draw if he manages to keep the opposition. If black does not have the opposition the position is lost. Keep in mind that the square of the protected passed pawn in both directions covers all the files. This means that black can use the whole length of the board to defend. So his mobility is not restricted along the files and by maintaining the defensive opposition he can hold the draw.
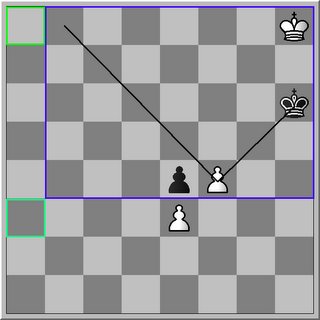
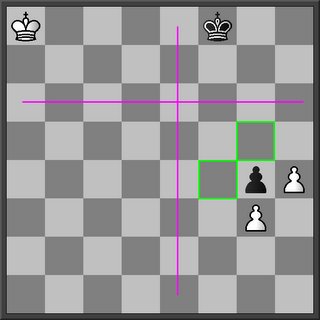
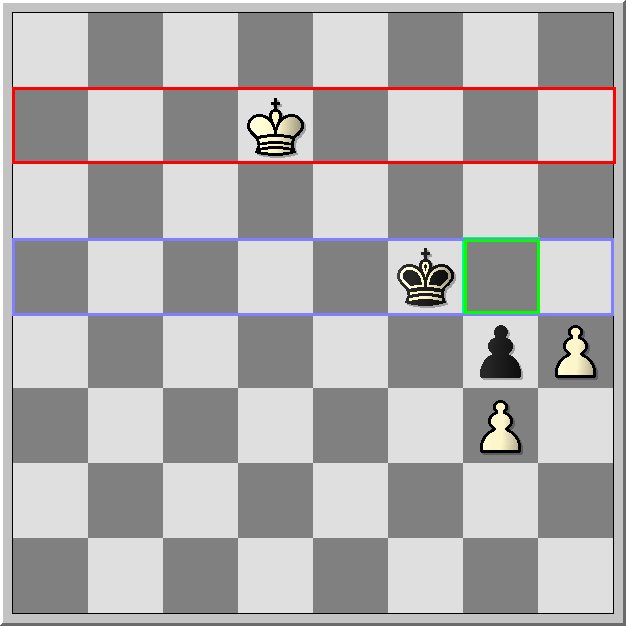
With a black K-center pawn the position is always a loss regardless of the relative positions of both kings.
Notice black cannot use the whole length of the board to defend an intrusion from the back. The first stage for white will be to bring his king down through the green squares.
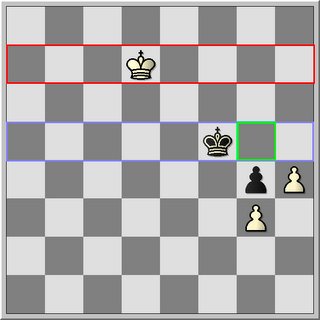
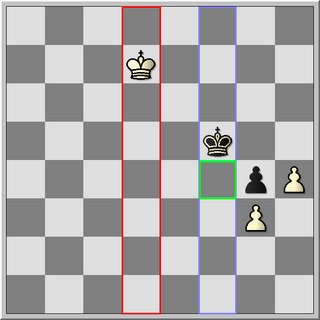
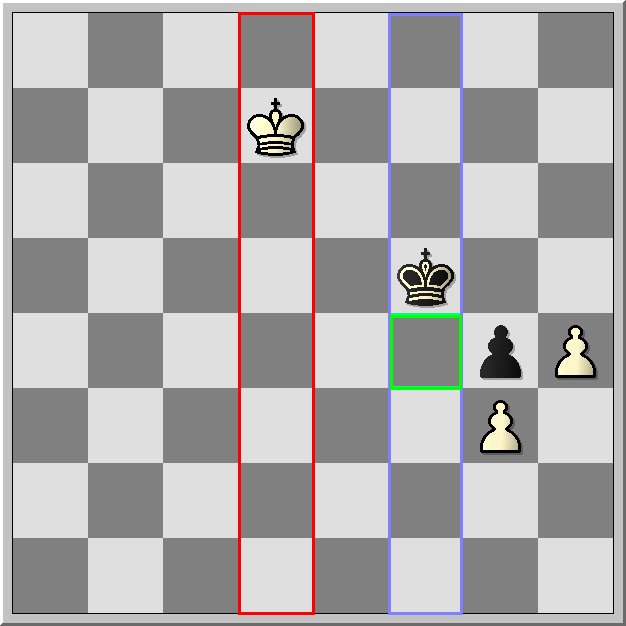
Now it becomes clear by looking at the invasion points there is no good defense for black. If white would be on b3 and black on b5 having the opposition, he would not be able to prevent a kingside invasion. As white goes from the Q-side to the kingside relative to the pawn position black needs an extra tempo tempo to prevent white's access to g3. The same holds in the opposite direction.
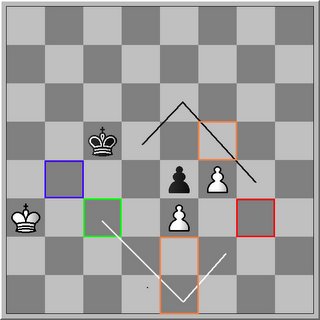
If we have a starting position with the kings respectively on g4 versus f2, black would not be able to prevent white reaching the blue square. Once white has access to the blue square, the capturing of the black pawn will become unstoppable.
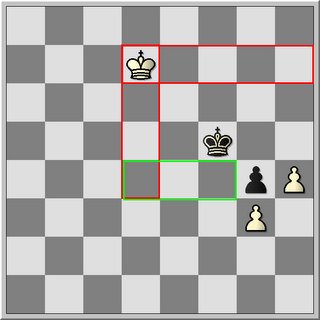
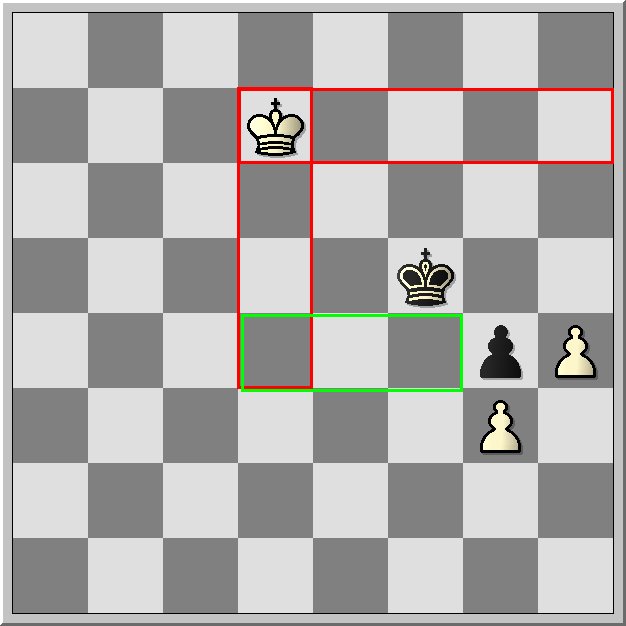
White's second mechanism to win is by triangulation using the orange squares. Here the white king triangulates not to gain the opposition but to force black to make a choice which invasion point he wants to defend. By choosing one invasion point he accepts the invasion of white through the other side.
Treating the following positions of the King's Bishop pawn or knight pawn might be a good opportunity to introduce the topic regarding the defensive opposition.
The defensive opposition: is the blocking movement used by the defender's king to prevent an intrusion of his territory. Failing in do so will most of the time lead to a win for the opponent.
For an intrusion the stronger side will need:
- space to invade (at least three files or ranks must be freely available, your opponents piece or unprotected pawn which can be captured on the move by the king must be included)
- the turn of the move must be in your opponents hands when your path is directly blocked by your opponent's king
Now let us consider the following example
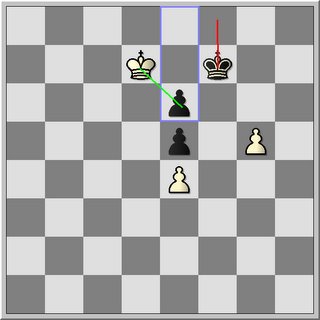
The defender black is in lateral position to white. If it is black's turn, then white has the opposition; the lateral opposition. On the other hand if it was white's turn black has the lateral opposition also named horizontal opposition.
With black to move, let us say 1...Kf8 white can invade black's position by capturing the black pawn.
With a black knight pawn and an outward protected passed pawn on the 4th rank black manages to hold the draw if he can maintain the defensive opposition.
Consider the following diagram:

This position is a win for white.
It is important to know that black cannot draw by counterattacking white's rear pawn. By trying to capture white's rear pawn he will find himself in a lost Q versus pawn ending.
By knowing this fact white is in no hurry to close up to the king.

In green we have the squares which are not accessible to the defender and which are under the controle of the pawns. White cannot invade as it is his turn to move. White will break the defensive opposition of black by moving in the direction of the green square. Reaching the green square black cannot hold the opposition anymore and the pawn will have a free run under the guidance of his king.
Now the same holds in vertical direction with the following starting position.

Again it is white's turn to move and black has the opposition. White will move to d4 and black cannot keep up. Once more black's defensive opposition has been broken by the non-accessibility of certain squares.
This knowledge can be the starting point to set up the minimal requirements and to find the axis where the black king can hold the defensive opposition.
In pink you find the minimal requirements shown by the axes where the black king has to be to keep the draw. We have an axis on the 6th rank and an axis on the e-file.
Until now we have not taken into account the restricted mobility of the black king and the crictical squares of the blocked pawn.

In green you have the critical squares of the rear pawn and in blue the square of the protected passed pawn which severely hampers to mobility of the defending king.
So bringing both pictures together we might conclude the following.
The primary determinant is the restricted area in which the defending king can move. Therefore the axis parts that falls out of this area is not accessible to the black king.
We see that e-file axis acts as the primary through the critical area. All critical squares fall within the area of the protected passed pawn, therefore the king can extend his defending zone to the d-file.
Black needs to maintain the opposition on the pink axes within area of the protected passed pawn.
Notice the d-file blue zone ( see diagram =/-) can completely used by the defender to keep the opposition and preventing white of lateral invading. Once more to have the opposition is crucial.

From an attackers point of view the win zone can easily be determined.
In horizontal direction the defensive opposition could be broken on 7th rank
In vertical direction the defensive opposition can be broken along the d-file.
The zone defines by the intersection of both red rectangles within the area of the protected passed pawn shows you the critical squares to obtain a win. Actually to be more precise, the outside critical square of white's rear pawn forms the corner with the new identified red critical squares. If white manages to reach one of these critical squares it will always be a win no matter what black does.
With a bishop pawn on the 4th rank and an outward protected passed pawn black normally draws by holding the defensive opposition. In the contrast to the inward protected passed pawn black cannot perform a counterattack against white's rear pawn. The king will be at the wrong side of the pawn - long side - to be stalemated when white's Q captures the pawn. Therefore black needs at least two moves to transfer his king to the right side (short side) of the board. This fact increases the territory of the white king to obtain a win.
With a pawn on the 3rd rank, following notions should be kept in mind:
1. if black manages to capture white's rear pawn a draw follows. The resulting Q-ending versus Q-ending should be a draw.
2. If white manages to reach the second rank, without losing his rear pawn he usely wins regardless if he has the opposition or not. However pawn positions with an outward protected passed pawn (OPP), could be drawn if black manages to keep the defensive opposition. This is not the case for a black pawn in the center with OPP on the bishop file, but clearly the case for an OPP on the knight and/or rook file.
Why: the stronger side has a second invasion point on the others side ot the pawn configuration which is not the case for an OPP on the knight and/or rook file.
3. The stronger side cannot invade lateral or from behind as the defender, located within the area of the protected passed pawn, just marches unhindered to his opponent's rear pawn securing the draw. Basically it comes down to the fact that if the defender is nearer to white's rear pawn than white is, the pawn can be grabbed unhindered. Also the critical squares in red defined for a pawn on the 4th rank does not exist for a pawn on the third rank.
4. For blocked center pawns white usely wins by outflanking his opponent on one or the other side. White has two invasion points, and the knight opposition on the corresponding squares cannot secure the draw. The shortest path for black is one tempo longer than for white. The kings' positions should be so that a direct attack against the rear pawn should not be allowed.
In the world defined by kings' mobility opposition should be seen as treat of the chessboard while corresponding squares as bounding treat of the position.
Only when white's king is on the 8th rank black can draw if he manages to keep the opposition. If black does not have the opposition the position is lost. Keep in mind that the square of the protected passed pawn in both directions covers all the files. This means that black can use the whole length of the board to defend. So his mobility is not restricted along the files and by maintaining the defensive opposition he can hold the draw.
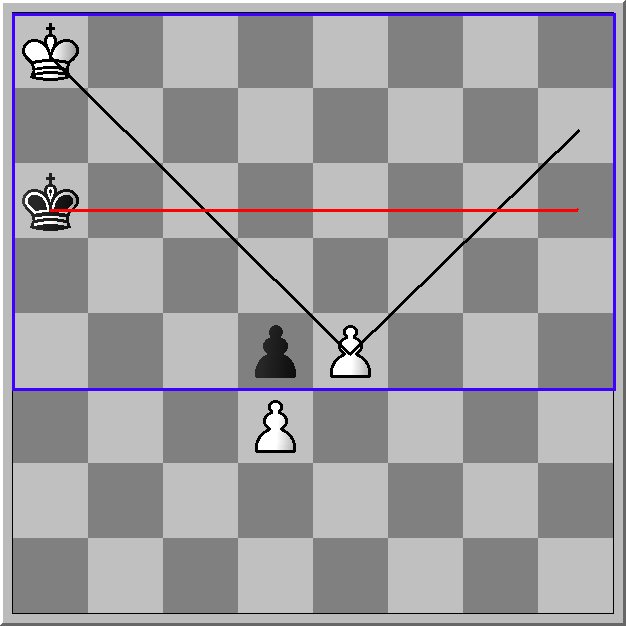
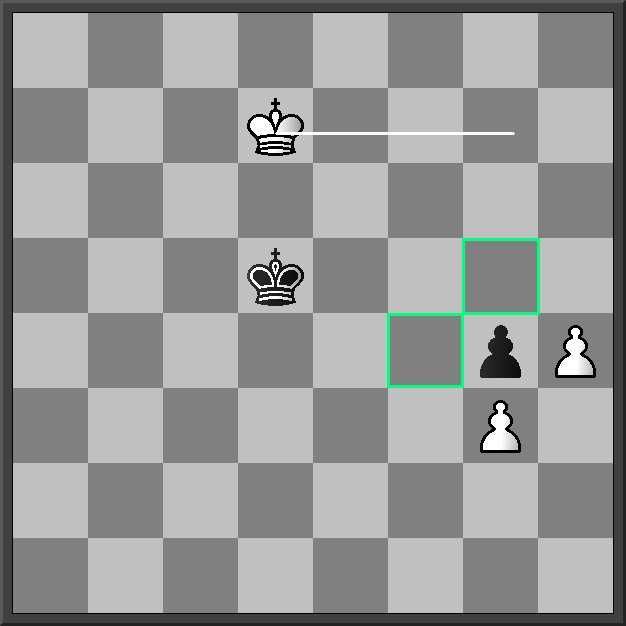
With a black K-center pawn the position is always a loss regardless of the relative positions of both kings.
Notice black cannot use the whole length of the board to defend an intrusion from the back. The first stage for white will be to bring his king down through the green squares.

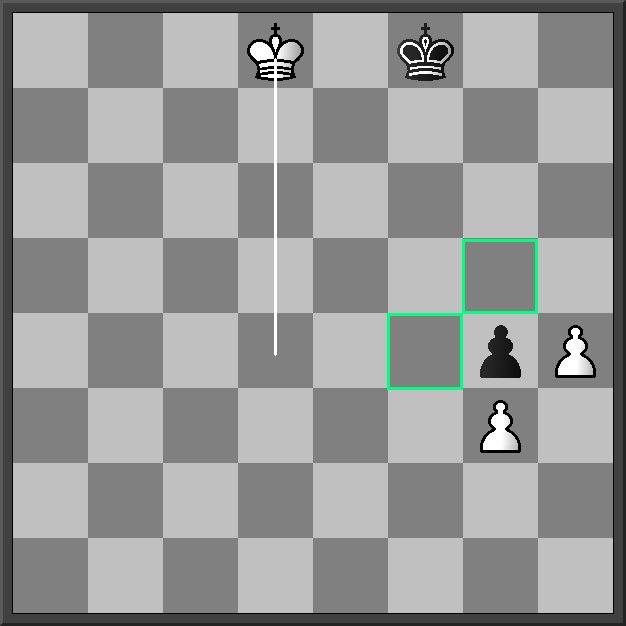
Now it becomes clear by looking at the invasion points there is no good defense for black. If white would be on b3 and black on b5 having the opposition, he would not be able to prevent a kingside invasion. As white goes from the Q-side to the kingside relative to the pawn position black needs an extra tempo tempo to prevent white's access to g3. The same holds in the opposite direction.
If we have a starting position with the kings respectively on g4 versus f2, black would not be able to prevent white reaching the blue square. Once white has access to the blue square, the capturing of the black pawn will become unstoppable.
White's second mechanism to win is by triangulation using the orange squares. Here the white king triangulates not to gain the opposition but to force black to make a choice which invasion point he wants to defend. By choosing one invasion point he accepts the invasion of white through the other side.
Treating the following positions of the King's Bishop pawn or knight pawn might be a good opportunity to introduce the topic regarding the defensive opposition.
The defensive opposition: is the blocking movement used by the defender's king to prevent an intrusion of his territory. Failing in do so will most of the time lead to a win for the opponent.
For an intrusion the stronger side will need:
- space to invade (at least three files or ranks must be freely available, your opponents piece or unprotected pawn which can be captured on the move by the king must be included)
- the turn of the move must be in your opponents hands when your path is directly blocked by your opponent's king
Now let us consider the following example
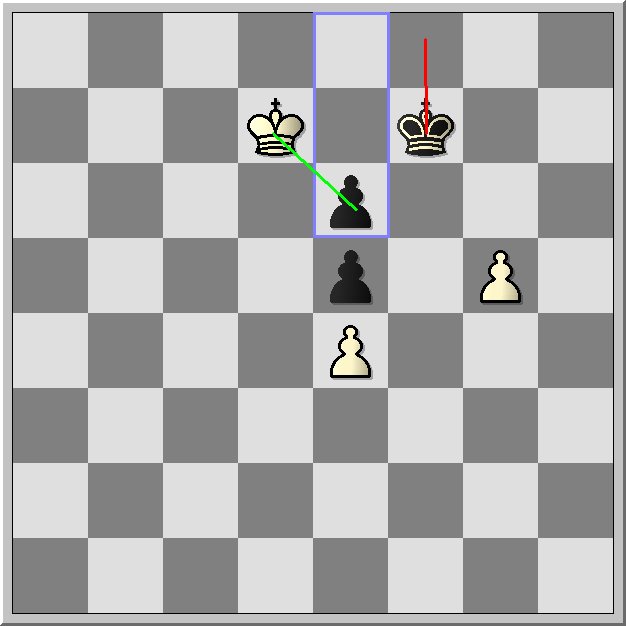
The defender black is in lateral position to white. If it is black's turn, then white has the opposition; the lateral opposition. On the other hand if it was white's turn black has the lateral opposition also named horizontal opposition.
With black to move, let us say 1...Kf8 white can invade black's position by capturing the black pawn.
With a black knight pawn and an outward protected passed pawn on the 4th rank black manages to hold the draw if he can maintain the defensive opposition.
Consider the following diagram:
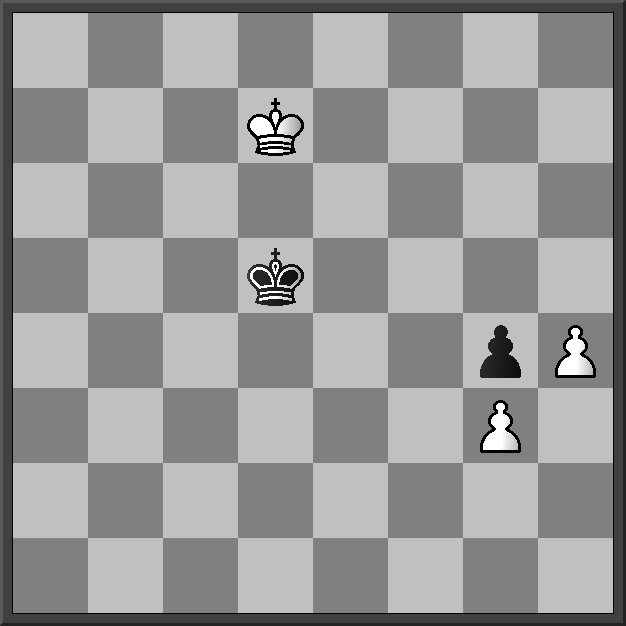
This position is a win for white.
It is important to know that black cannot draw by counterattacking white's rear pawn. By trying to capture white's rear pawn he will find himself in a lost Q versus pawn ending.
By knowing this fact white is in no hurry to close up to the king.
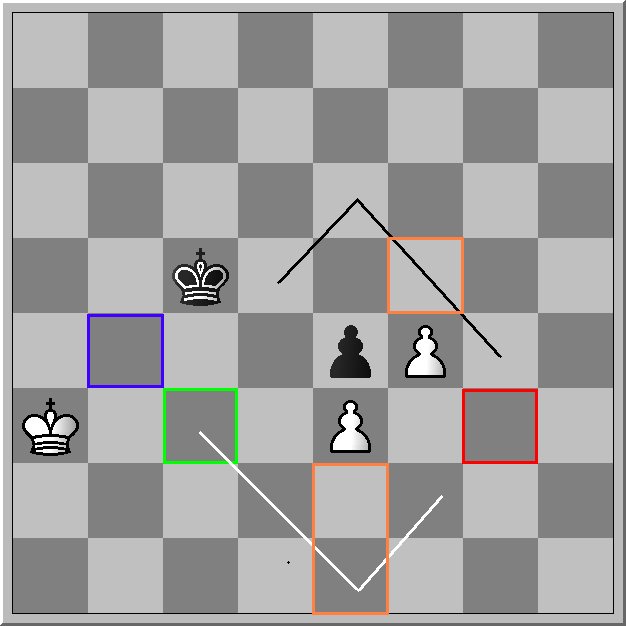
In green we have the squares which are not accessible to the defender and which are under the controle of the pawns. White cannot invade as it is his turn to move. White will break the defensive opposition of black by moving in the direction of the green square. Reaching the green square black cannot hold the opposition anymore and the pawn will have a free run under the guidance of his king.
Now the same holds in vertical direction with the following starting position.
Again it is white's turn to move and black has the opposition. White will move to d4 and black cannot keep up. Once more black's defensive opposition has been broken by the non-accessibility of certain squares.
This knowledge can be the starting point to set up the minimal requirements and to find the axis where the black king can hold the defensive opposition.
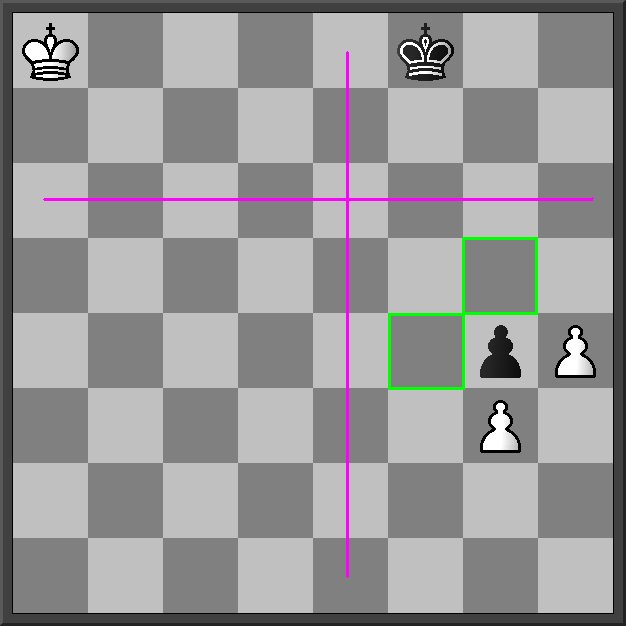
In pink you find the minimal requirements shown by the axes where the black king has to be to keep the draw. We have an axis on the 6th rank and an axis on the e-file.
Until now we have not taken into account the restricted mobility of the black king and the crictical squares of the blocked pawn.
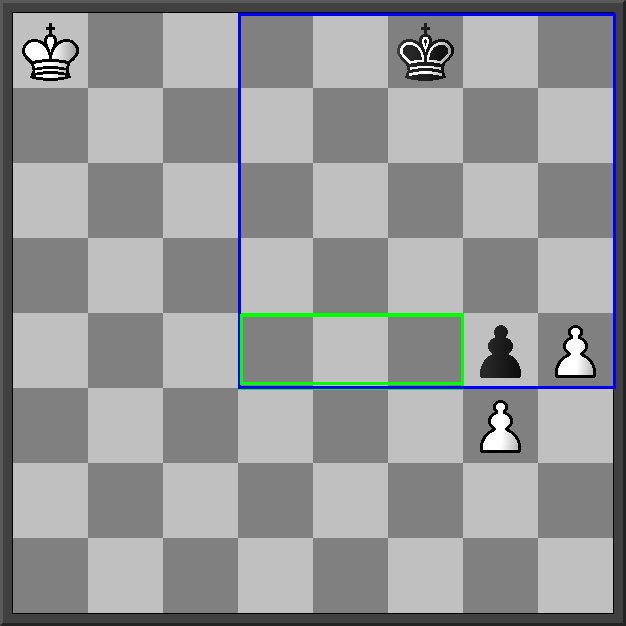
In green you have the critical squares of the rear pawn and in blue the square of the protected passed pawn which severely hampers to mobility of the defending king.
So bringing both pictures together we might conclude the following.
The primary determinant is the restricted area in which the defending king can move. Therefore the axis parts that falls out of this area is not accessible to the black king.
We see that e-file axis acts as the primary through the critical area. All critical squares fall within the area of the protected passed pawn, therefore the king can extend his defending zone to the d-file.
Black needs to maintain the opposition on the pink axes within area of the protected passed pawn.
Notice the d-file blue zone ( see diagram =/-) can completely used by the defender to keep the opposition and preventing white of lateral invading. Once more to have the opposition is crucial.

From an attackers point of view the win zone can easily be determined.
In horizontal direction the defensive opposition could be broken on 7th rank
In vertical direction the defensive opposition can be broken along the d-file.
The zone defines by the intersection of both red rectangles within the area of the protected passed pawn shows you the critical squares to obtain a win. Actually to be more precise, the outside critical square of white's rear pawn forms the corner with the new identified red critical squares. If white manages to reach one of these critical squares it will always be a win no matter what black does.
With a bishop pawn on the 4th rank and an outward protected passed pawn black normally draws by holding the defensive opposition. In the contrast to the inward protected passed pawn black cannot perform a counterattack against white's rear pawn. The king will be at the wrong side of the pawn - long side - to be stalemated when white's Q captures the pawn. Therefore black needs at least two moves to transfer his king to the right side (short side) of the board. This fact increases the territory of the white king to obtain a win.
With a pawn on the 3rd rank, following notions should be kept in mind:
1. if black manages to capture white's rear pawn a draw follows. The resulting Q-ending versus Q-ending should be a draw.
2. If white manages to reach the second rank, without losing his rear pawn he usely wins regardless if he has the opposition or not. However pawn positions with an outward protected passed pawn (OPP), could be drawn if black manages to keep the defensive opposition. This is not the case for a black pawn in the center with OPP on the bishop file, but clearly the case for an OPP on the knight and/or rook file.
Why: the stronger side has a second invasion point on the others side ot the pawn configuration which is not the case for an OPP on the knight and/or rook file.
3. The stronger side cannot invade lateral or from behind as the defender, located within the area of the protected passed pawn, just marches unhindered to his opponent's rear pawn securing the draw. Basically it comes down to the fact that if the defender is nearer to white's rear pawn than white is, the pawn can be grabbed unhindered. Also the critical squares in red defined for a pawn on the 4th rank does not exist for a pawn on the third rank.
4. For blocked center pawns white usely wins by outflanking his opponent on one or the other side. White has two invasion points, and the knight opposition on the corresponding squares cannot secure the draw. The shortest path for black is one tempo longer than for white. The kings' positions should be so that a direct attack against the rear pawn should not be allowed.
In the world defined by kings' mobility opposition should be seen as treat of the chessboard while corresponding squares as bounding treat of the position.
posted by Montse at 11:06 AM
![]()

5 Comments:
Thank you for a very instructive post. I'll be back here for sure to get a endgame injection.
have you used Endgame Strategy? i love that book. david
When you have done with all this, it would be a great service for we patzers to put all your endgame stuff together into a single .PDF document.
dude i read this during the week, and played a long game on ICC today .. and own !
thanks a mill
David,
No this book, Endgame Strategy - shereshevsky, is still to complex. I keep it simple but i sometimes use the idea of the two weaknesses or one who can holds two, etc.
BDK,
If you have adobe publisher, you can pdf the whole thing directly from the screen, convert it to a word file and adjust the content or rescale the pictures.Anyway I am working on it at my job during lunch breaks.
St-Patzer
Nice to hear!
Post a Comment
<< Home