K+2P versus K+P - Protected passed pawn - Part I
In theory you should be able to play all static K + P versus K + P correctly. With static I mean all positions where the pawns are blocked, and the only moveable pieces left are the kings. A good way to practice your knowledge is to isolate on a regular base 50 positions. Evaluate them as a win or a draw, and then play through the positions. Evaluation is based on the knowledge of the important target squares. The positions should be checked against the Namilov endgame tables. In the beginning the evaluation make take some time, but once you have grasp the theory,then later on you will be able to decide in a flash how to play the positions. It will become your second nature to check the relative positions of the kings versus their target squares and if their paths will actually cross. See you in the meeting hall.
Let's move on to King + 2P versus King + P static positions
There are 35 unique positions with a protected passed pawn.
Note: Generally speaking, the backward pawn of the chain can 'never' be attacked and captured by the defender's king (here always black) or otherwise the protected passed pawn will have a free run to his queening point. With other words the black king will be bound to the rank of the protected passed pawn and in most cases will be punished when he dares to cross the rank. (All cases will be handled)
As blunderprone stated it is time to sharpen the rusty sword again. It could have sounded as "Next head please, don't be shy - go on. It will be a clean chop. Trust me, I know what I am doing."
Let us consider the white protected passed pawn be to the right of the blocked position.
With a black pawn on the 7th rank 3 positions are drawn with an optimal black king position. The rest of the positions are a win no matter where the black king stands.
This is the case for a black RP (a-file), NP (b-file), NP (g-file).
Position QRP - a-file
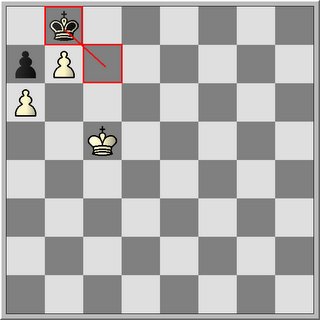
The Black king can hold the draw by alternating through the squares b8-c7. White cannot approach or get the black king out without stalemating the opponent.
Position QNP - b-file
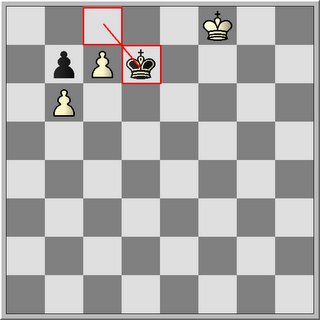
The rook file is not accessible for infiltration. The Black king can hold the draw by alternating through the squares c8-d7. White cannot approach or get the black king out without stalemating the opponent.
Position NP - g-file
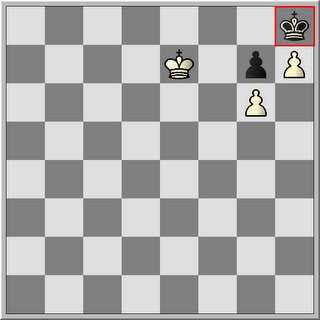
The black king have to be on h8 to be stalemated.
Position RP - h-file

The case with a black rook pawn (RP) on the h-file cannot be considered unique as the position is symmetrically to the position on the a-file. The protected passed pawn will be to your left side or is pointing to the Q-side.
The 4 other positions (QBP, QP, KP (king pawn), BP) are an easy win. The easiest way to my taste is the outflanking approach.
Notice that the protected passed pawn controls black's passage to the Q-side. Therefore the black pawn has been cut-off of the direct protection of the black king.
So the winning mechanism exists in bringing your king to the Q-side and capturing the black pawn.
Second mechanism is by sacrificing the protected passed pawn and obtaining an optimal position with your king so that you can force the black king to give up his pawn.
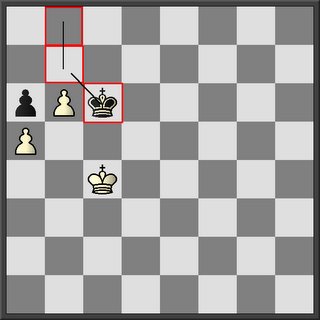
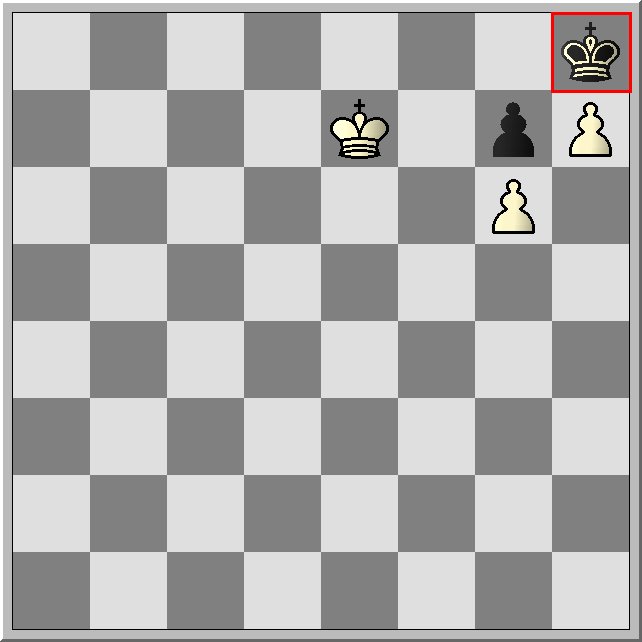
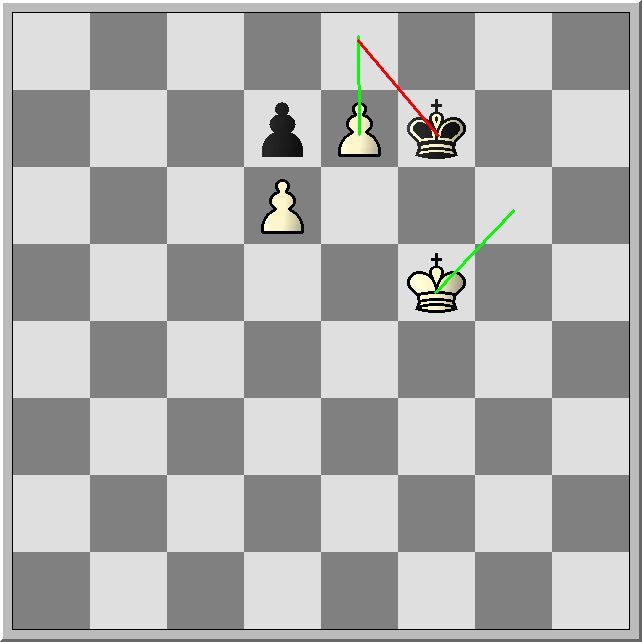
Initial position - Kingside outflanking by sacrificing the protected passed pawn
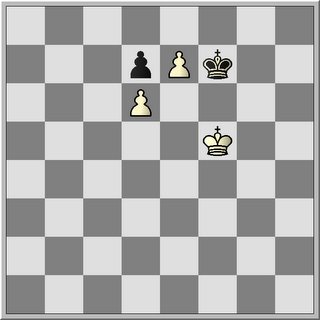
In light green you have the critical squares at the right side of the blocked pawn. Notice the yellow vertical line. To obtain an invasion of the critical squares you like to be in opposition. If black has to move white can invade.
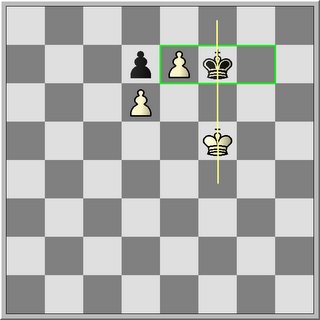
Here, it is white's turn to play. By promoting the protected passed pawn white is forcing black to capture and now he has this extra tempo which makes it possible to invade black's kingside flank.

Black has two choices. He can either play Kf8 or go to c6. If he plays Kf8 white can take the direct opposition. Black is in zugzwang and white can on his next move take control of one the critical squares. Now it becomes unstoppable for black to prevent white of capturing his pawn. And with this the game is over. The second choice c6 is too far off for (the black king) and is neither an option to play.
This mechanism is not possible for the QRP, QNP as black will be able to protect the pawn. Black can freely alternate on a8-b8.
White cannot approach or black will be stalemated.
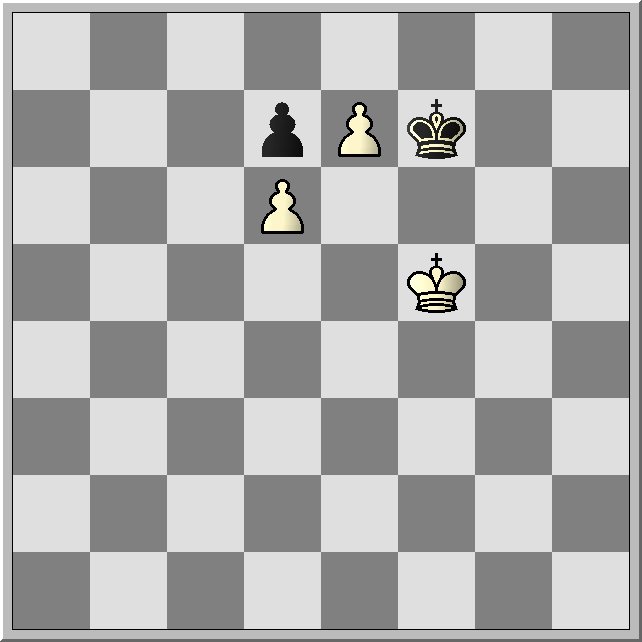
With a black pawn on the 6th rank 1 position is still a draw with an optimal king position for black. The other 6 positions (QNP, QBP, QP, KP, BP, NP) are a win no matter where the black king stands.
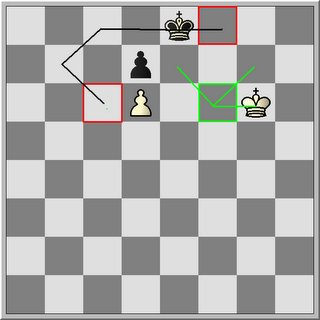
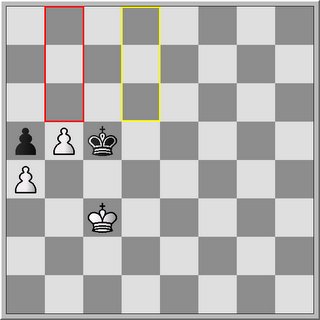
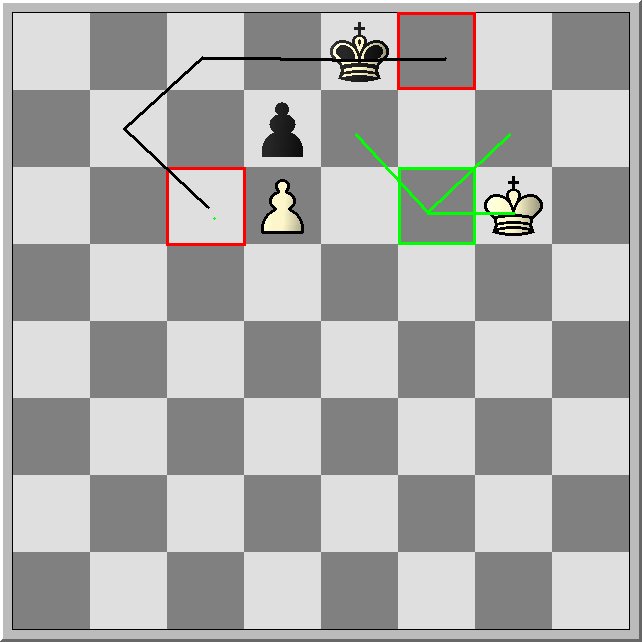
Draw position
The sacrifice of the pawn to gain a tempo to invade the position of black does lead to the capture of black pawn. Unfortunately, depending on which site you play, the capture of black pawn is not enough to win the game. It is impossible to promote your pawn on correct play of black.
Without the pawn sacrifice it is interesting to note that black has 2 ranks (7th and 8th) to defend while white needs at least 3 ranks with the opposition to invade black's position lateral. The same holds for files.
The red squares shows you how black can defend if white does not sacrifice the pawn.
The sacrifice of the pawn must happen in such away so that white can improve his king position by taking control of the critical squares.
For the other 6 positions (QNP to NP) the obtained K+P versus K position leads to favorable pawn promotion.
So the winning mechanism is by sacrificing the pawn to outflank Black's king position.
It might be good to learn first the positions to play with the king in direct opposition. Later you can move both kings to other positions.
Another mechanism which unfortunately is not applicable for all situations but is a must to know. You will love this one.
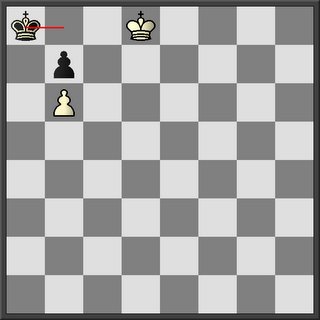
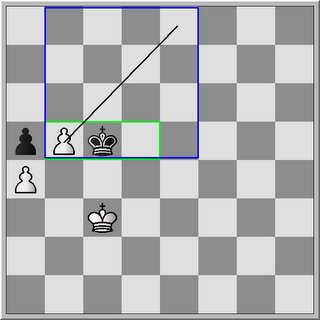
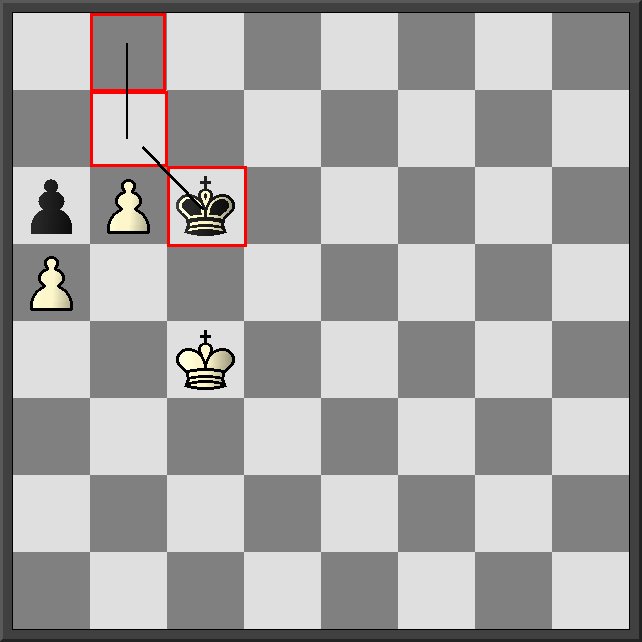
Consider the following position:

The light green square shows the critical squares of the blocked white pawn. The blue square shows you the square of the protected passed pawn in both directions. The black king has to stay within the blue square or otherwise the protected passed pawn will have a free run.
So what do you see? Some critical squares fall outside the blue square (square of the pawn in both directions). We immediately see that white can perform a Q-side outflanking without even to bother what black might play. The black pawn is doomed and white has identified his target squares. White just go to b6 or a6 (a bit slower and more painful).
The Q-side outflanking (or invasion) mechanism is applicable for the QBP to the NP. In case of the QBP, the black king might stop your progress to a6 by playing b7. By pushing your protected passed pawn forward black will be obliged to give white access to the critical a6 square and this should be decisive.
However, it is not applicable for the QNP (b-file) as white has no free file left to invade.
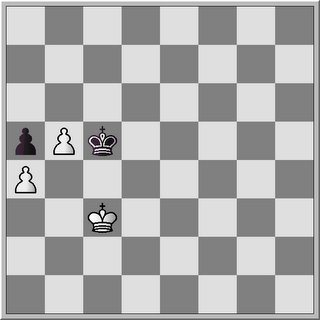
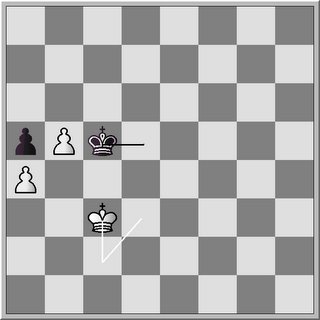
With a black pawn on the 5th rank all positions are lost for black. Again we start with both kings in direct opposition as this shows you the basic mechanism on how to invade on the kingside.
Note: the black king becomes vulnerable at his lateral side (3 ranks to protect - see red squares versus the yellow squares for white)
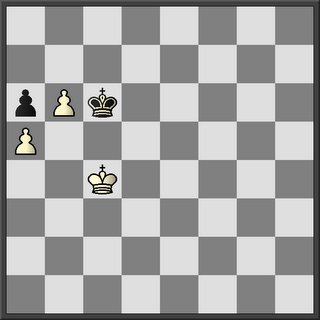
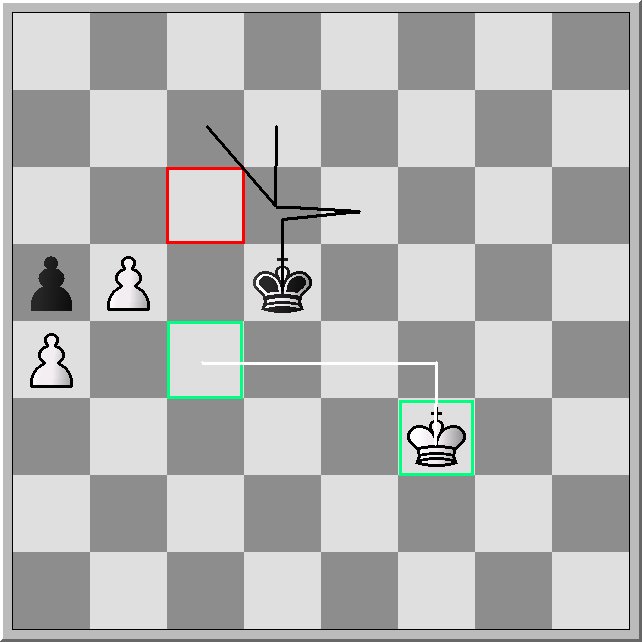
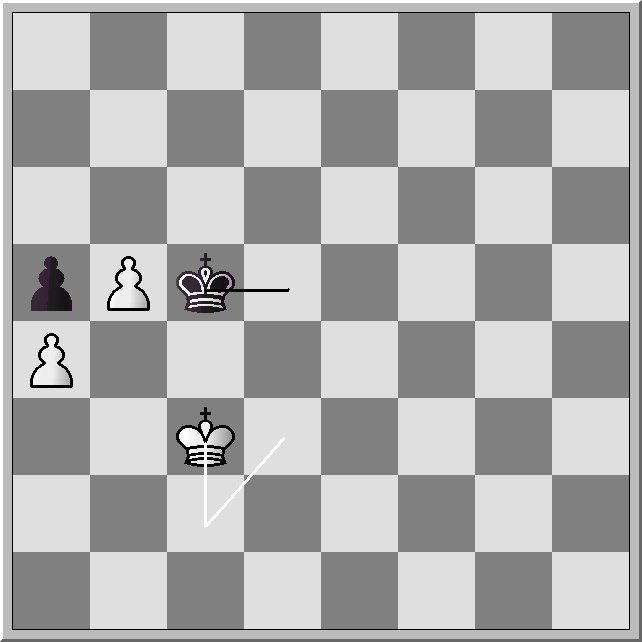
Initial position - Kingside invasion
In light green we have the 3 critical squares for the blocked pawn. In blue the square of the pawn (in one direction) which restricts the mobility of the black king.
In the first mechanism we make use of the space advantage that white has against the black king. Remember the mobility of the black king is hampered by the protected passed pawn. Thus, the black king is restricted. This notion white will exploit at the fullest to improve his king position and eventually turn to the game into his advantage.
Black has the opposition, so it is white to play.
1. White's is going to f3. Why? In this way black will be forced to make a concession. There is no direct opposing field left because f5 lays outside the square of pawn. Moving the black king to f5 would lead to a free run of the protected passed pawn.
To prevent white invading along the ranks black needs to be always in close direct opposition. (If you are not sure just put 2 kings on the board and prevent the other king going up one rank; this can only be done by being in close direct opposition).
White will use this to hand the move to black. When white moves to the right black just follows. But when white plays f3 black cannot follow, he has to play a different move. And according to black's play, white will adjust his play. So black has been put in zugzwang, and his next move will allow white to invade black's position.
Black has three choices on 1.Kf3:
1. Kf3 Kd5 - taking the close diagonal opposition, White will move up one rank to Kf4.
2. Kf3 Kd6 - white plays Ke4 and black goes in close opposition by playing Ke6.
3. Kf3 Ke6 - white plays Ke4 (latter is less interesting as white is already in opposition)
In case 1 & 2 Black handed the move to white and restored the fact he regains the opposition at the cost of one rank. In case number three he is worse of , giving up one rank without regaining the opposition.
White would make no progress if black was allowed to play on every square on the 6th rank. This is not the case. One can easily see that c6 is not accessible for Black, meaning c4 and e6 has no counterpart in close direct or lateral opposition.
Again white will use the same technique to invade black's king position. White's target square is c4. On c4 he will hand the move over to black. Again black will be forced to do a concession, giving up a rank and allowing white to reach the critical squares on the fifth rank. Now white is in a position to attack black's pawn and with this winning the game.
So 1Kf4 Kd6 2. Ke4 Ke6 (regaining the opposition) 3. Kd4 Kd6 4. Kc4 (zugzwang)

Short summary for the kingside invasion mechanism
White is making full usage of the restricted mobility of the black king. Target squares for white are those squares where black has no corresponding square in close direct opposition. Either these squares can be outside the square of the pawn or not immediately accessible to the black king.
This mechanism is actually limited in the sense that this kind of play only counts for the rook, knight or bishop file.
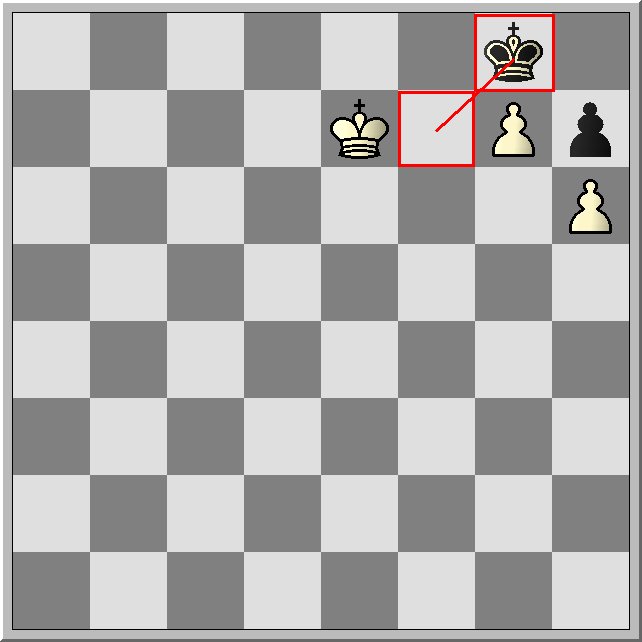
We can also force the win through a similar approach. Actually white does not have to go to f3 to obtain a winning position. A more general mechanism is what I call the X-cross mechanism.
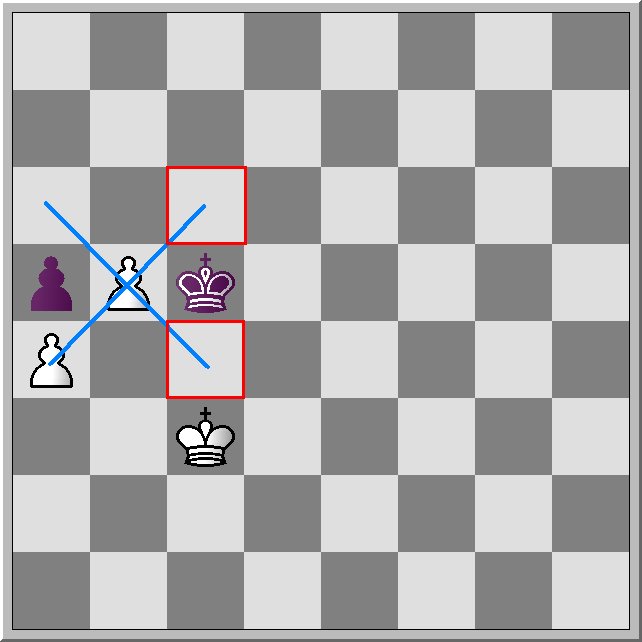
Let us consider the following position with white to play
You draw a cross through the protected passed pawn. The red squares are the fields which are not accessible to the black king. By identifying those field white can easily find his squares which are in direct or in distant opposition.

Intermezzo - opposition -
There are two kinds of light squares which can never be in any form of opposition to each other. You can easily find the squares of one color, which are in opposition, by drawing a rectangle or a square consisting out of four corners of the same color. Those same color fields (light squares) which fall out of it can never be in opposition with the corner squares. Practically speaking the chess board with its 64 squares can be reduced to a square consisting out of 4 unique fields and those 4 unique fields are in opposition with the rest of the board. Thus the king on the dark square a1 can never be in opposition to a king on b4,d2,f2,d4,f6,h6, ... but can be to a king on all dark squares on the c-file, e-file and g-file and on the remaining squares left on the a-file.
So a black king stuck on c5, who cannot access the upper and lower light square on the same file, has actually no good reply to c2. For black there is no accessible corresponding square to c2. C4 is out of the question or otherwise the pawn will promote unhindered. So only c6 remains and this square is not accessible.
By playing c2, white can immediately put black into zugzwang. White is handing the move to black and on his reply he will play accordingly. So the akward move c2 becomes quite understandable. Black has no good reply.
So on 1.Kc2Kd5 follows 2.Kd3 taking the opposition and black cannot avoid white reaching the 4th rank. The rest follows the same principle as mentioned above, exploiting again the weakness on c6.
So this Kingside invasion mechanism needs much less space. it is valid for a black pawn on the a- to d-file. With a protected passed pawn on the f-file this mechanism cannot be applied.
Observation: A kingside invasion mechanism is always possible with a blocked black pawn on the fifth rank and an inward protected passed pawn.
Let's move on to King + 2P versus King + P static positions
There are 35 unique positions with a protected passed pawn.
Note: Generally speaking, the backward pawn of the chain can 'never' be attacked and captured by the defender's king (here always black) or otherwise the protected passed pawn will have a free run to his queening point. With other words the black king will be bound to the rank of the protected passed pawn and in most cases will be punished when he dares to cross the rank. (All cases will be handled)
As blunderprone stated it is time to sharpen the rusty sword again. It could have sounded as "Next head please, don't be shy - go on. It will be a clean chop. Trust me, I know what I am doing."
Let us consider the white protected passed pawn be to the right of the blocked position.
With a black pawn on the 7th rank 3 positions are drawn with an optimal black king position. The rest of the positions are a win no matter where the black king stands.
This is the case for a black RP (a-file), NP (b-file), NP (g-file).
Position QRP - a-file

The Black king can hold the draw by alternating through the squares b8-c7. White cannot approach or get the black king out without stalemating the opponent.
Position QNP - b-file

The rook file is not accessible for infiltration. The Black king can hold the draw by alternating through the squares c8-d7. White cannot approach or get the black king out without stalemating the opponent.
Position NP - g-file
The black king have to be on h8 to be stalemated.
Position RP - h-file
The case with a black rook pawn (RP) on the h-file cannot be considered unique as the position is symmetrically to the position on the a-file. The protected passed pawn will be to your left side or is pointing to the Q-side.
The 4 other positions (QBP, QP, KP (king pawn), BP) are an easy win. The easiest way to my taste is the outflanking approach.
Notice that the protected passed pawn controls black's passage to the Q-side. Therefore the black pawn has been cut-off of the direct protection of the black king.
So the winning mechanism exists in bringing your king to the Q-side and capturing the black pawn.
Second mechanism is by sacrificing the protected passed pawn and obtaining an optimal position with your king so that you can force the black king to give up his pawn.
Initial position - Kingside outflanking by sacrificing the protected passed pawn
In light green you have the critical squares at the right side of the blocked pawn. Notice the yellow vertical line. To obtain an invasion of the critical squares you like to be in opposition. If black has to move white can invade.

Here, it is white's turn to play. By promoting the protected passed pawn white is forcing black to capture and now he has this extra tempo which makes it possible to invade black's kingside flank.
Black has two choices. He can either play Kf8 or go to c6. If he plays Kf8 white can take the direct opposition. Black is in zugzwang and white can on his next move take control of one the critical squares. Now it becomes unstoppable for black to prevent white of capturing his pawn. And with this the game is over. The second choice c6 is too far off for (the black king) and is neither an option to play.
This mechanism is not possible for the QRP, QNP as black will be able to protect the pawn. Black can freely alternate on a8-b8.

White cannot approach or black will be stalemated.
With a black pawn on the 6th rank 1 position is still a draw with an optimal king position for black. The other 6 positions (QNP, QBP, QP, KP, BP, NP) are a win no matter where the black king stands.
Draw position

The sacrifice of the pawn to gain a tempo to invade the position of black does lead to the capture of black pawn. Unfortunately, depending on which site you play, the capture of black pawn is not enough to win the game. It is impossible to promote your pawn on correct play of black.
Without the pawn sacrifice it is interesting to note that black has 2 ranks (7th and 8th) to defend while white needs at least 3 ranks with the opposition to invade black's position lateral. The same holds for files.
The red squares shows you how black can defend if white does not sacrifice the pawn.
The sacrifice of the pawn must happen in such away so that white can improve his king position by taking control of the critical squares.
For the other 6 positions (QNP to NP) the obtained K+P versus K position leads to favorable pawn promotion.
So the winning mechanism is by sacrificing the pawn to outflank Black's king position.
It might be good to learn first the positions to play with the king in direct opposition. Later you can move both kings to other positions.
Another mechanism which unfortunately is not applicable for all situations but is a must to know. You will love this one.
Consider the following position:

The light green square shows the critical squares of the blocked white pawn. The blue square shows you the square of the protected passed pawn in both directions. The black king has to stay within the blue square or otherwise the protected passed pawn will have a free run.
So what do you see? Some critical squares fall outside the blue square (square of the pawn in both directions). We immediately see that white can perform a Q-side outflanking without even to bother what black might play. The black pawn is doomed and white has identified his target squares. White just go to b6 or a6 (a bit slower and more painful).
The Q-side outflanking (or invasion) mechanism is applicable for the QBP to the NP. In case of the QBP, the black king might stop your progress to a6 by playing b7. By pushing your protected passed pawn forward black will be obliged to give white access to the critical a6 square and this should be decisive.
However, it is not applicable for the QNP (b-file) as white has no free file left to invade.
With a black pawn on the 5th rank all positions are lost for black. Again we start with both kings in direct opposition as this shows you the basic mechanism on how to invade on the kingside.
Note: the black king becomes vulnerable at his lateral side (3 ranks to protect - see red squares versus the yellow squares for white)

Initial position - Kingside invasion
In light green we have the 3 critical squares for the blocked pawn. In blue the square of the pawn (in one direction) which restricts the mobility of the black king.

In the first mechanism we make use of the space advantage that white has against the black king. Remember the mobility of the black king is hampered by the protected passed pawn. Thus, the black king is restricted. This notion white will exploit at the fullest to improve his king position and eventually turn to the game into his advantage.
Black has the opposition, so it is white to play.
1. White's is going to f3. Why? In this way black will be forced to make a concession. There is no direct opposing field left because f5 lays outside the square of pawn. Moving the black king to f5 would lead to a free run of the protected passed pawn.
To prevent white invading along the ranks black needs to be always in close direct opposition. (If you are not sure just put 2 kings on the board and prevent the other king going up one rank; this can only be done by being in close direct opposition).
White will use this to hand the move to black. When white moves to the right black just follows. But when white plays f3 black cannot follow, he has to play a different move. And according to black's play, white will adjust his play. So black has been put in zugzwang, and his next move will allow white to invade black's position.
Black has three choices on 1.Kf3:
1. Kf3 Kd5 - taking the close diagonal opposition, White will move up one rank to Kf4.
2. Kf3 Kd6 - white plays Ke4 and black goes in close opposition by playing Ke6.
3. Kf3 Ke6 - white plays Ke4 (latter is less interesting as white is already in opposition)
In case 1 & 2 Black handed the move to white and restored the fact he regains the opposition at the cost of one rank. In case number three he is worse of , giving up one rank without regaining the opposition.
White would make no progress if black was allowed to play on every square on the 6th rank. This is not the case. One can easily see that c6 is not accessible for Black, meaning c4 and e6 has no counterpart in close direct or lateral opposition.
Again white will use the same technique to invade black's king position. White's target square is c4. On c4 he will hand the move over to black. Again black will be forced to do a concession, giving up a rank and allowing white to reach the critical squares on the fifth rank. Now white is in a position to attack black's pawn and with this winning the game.
So 1Kf4 Kd6 2. Ke4 Ke6 (regaining the opposition) 3. Kd4 Kd6 4. Kc4 (zugzwang)
Short summary for the kingside invasion mechanism
White is making full usage of the restricted mobility of the black king. Target squares for white are those squares where black has no corresponding square in close direct opposition. Either these squares can be outside the square of the pawn or not immediately accessible to the black king.
This mechanism is actually limited in the sense that this kind of play only counts for the rook, knight or bishop file.
We can also force the win through a similar approach. Actually white does not have to go to f3 to obtain a winning position. A more general mechanism is what I call the X-cross mechanism.
Let us consider the following position with white to play

You draw a cross through the protected passed pawn. The red squares are the fields which are not accessible to the black king. By identifying those field white can easily find his squares which are in direct or in distant opposition.
Intermezzo - opposition -
There are two kinds of light squares which can never be in any form of opposition to each other. You can easily find the squares of one color, which are in opposition, by drawing a rectangle or a square consisting out of four corners of the same color. Those same color fields (light squares) which fall out of it can never be in opposition with the corner squares. Practically speaking the chess board with its 64 squares can be reduced to a square consisting out of 4 unique fields and those 4 unique fields are in opposition with the rest of the board. Thus the king on the dark square a1 can never be in opposition to a king on b4,d2,f2,d4,f6,h6, ... but can be to a king on all dark squares on the c-file, e-file and g-file and on the remaining squares left on the a-file.
So a black king stuck on c5, who cannot access the upper and lower light square on the same file, has actually no good reply to c2. For black there is no accessible corresponding square to c2. C4 is out of the question or otherwise the pawn will promote unhindered. So only c6 remains and this square is not accessible.
By playing c2, white can immediately put black into zugzwang. White is handing the move to black and on his reply he will play accordingly. So the akward move c2 becomes quite understandable. Black has no good reply.
So on 1.Kc2Kd5 follows 2.Kd3 taking the opposition and black cannot avoid white reaching the 4th rank. The rest follows the same principle as mentioned above, exploiting again the weakness on c6.
So this Kingside invasion mechanism needs much less space. it is valid for a black pawn on the a- to d-file. With a protected passed pawn on the f-file this mechanism cannot be applied.
Observation: A kingside invasion mechanism is always possible with a blocked black pawn on the fifth rank and an inward protected passed pawn.
posted by Montse at 3:55 AM
![]()

4 Comments:
I was thinking about writing a post about this subject myself. It doesn't seem to be necessary anymore:)
OOps, there is still the backward pawn
this is the single smartest post i have seen yet on blogger for chess. i must sit in the back seat in the back row now and never say another word when you are present. thank you.
this is a lot of brilliant pure chess content. and of you, kind sir? may we learn anything of you? how interesting a person you must be!
whether you play sports, or work in technology, or finance? our chess is in the context of a life...
this work of your is so good! thank you. david
Transfo, you are flattering me too much.
Post a Comment
<< Home