Basic pawn endings: Blocked rook pawns
On the 20th of March I would have wrote this follow-up. Something came in between - result it was stored away luckily not indefinite.
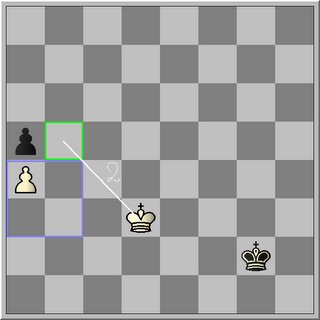
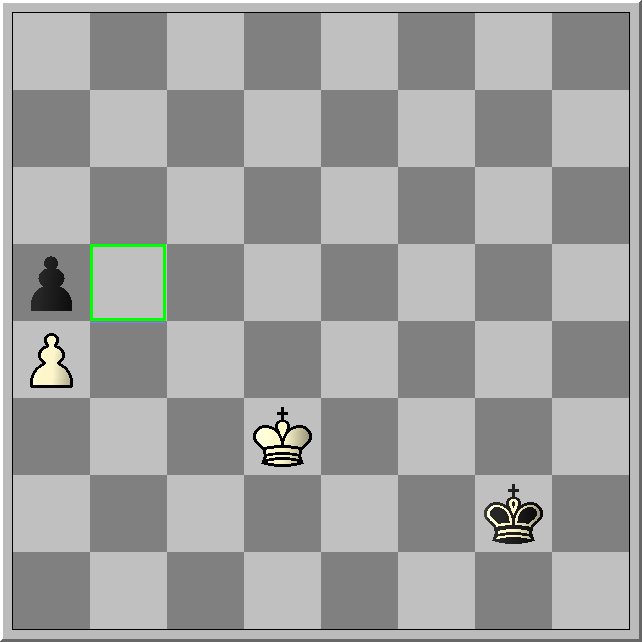
When we have a blocked rook pawn position it is important to notice that there is no turtle position to save the pawn. Simply because no file exist beyond the h - or before the a - file. So it comes down to the fact that the pawn can only be attacked or defended by the (hostile) king from one side of the board.
Furthermore the position shows that the hostile king can only attack the pawn from behind or from aside. This gives the pawn 3 vulnerable squares (violet).
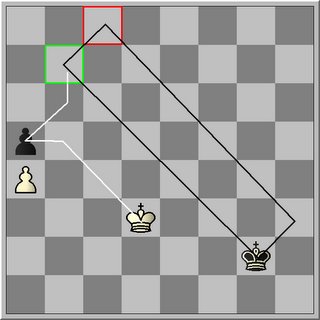
Let us have a closer look to the following example: a4Kd3a5Kg2

Your first question should be something like: what are the target squares black has to go for to obtain a draw? And not something like "How to judge this position"? because this implies you know the mechanisms and have a total overview.
Before you can judge this position you have to know what kind of defenses black has. Only through the knowledge of the draw positions you will see which target squares will become important. Once you know that it is a rat race to the right square. .
Black has general speaking two important means of defenses to draw the position? It does not mean that he has two ways to play the position but the type of defenses are related to the target squares black can play for.
First defense is the square defense.
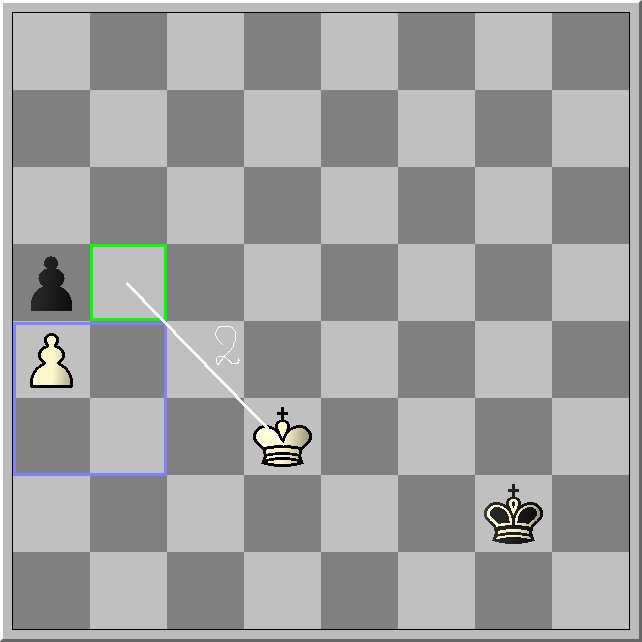
The target square is c8 (= the square on the back rank on the bishop file). If black managed to be there first, it does not matter where the white king stands or whether he has captured the black pawn or not, a draw follows.
This shows immediately that for white his target square will be b7. If he occupies b7 black is shut off of his vital square. If white wants to queen his pawn, he is obliged to capture the black pawn to free the path of the white pawn.
For white to calculate the amount of moves to b7 = distance (white king - black pawn) + distance (black pawn - target square b7). The distance is being expressed in # moves necessary to reach the target square.
# moves = (d-file - a-file) + ( b7 - a5) = (4-1) + (7-5) = 5
For black to calculate the amount of moves to c8 = distance (black king position - c8)
# moves to c8 = (c8 -g2) = 8 - 2 = 6
From this knowledge one can easily draw the conclusion that black cannot draw the position through this defense. This would be true if both defenses (lateral or square defense) would be totally non-related items on the board. As previous shown there are many routes to the same square but only a few which covers the shortest path.
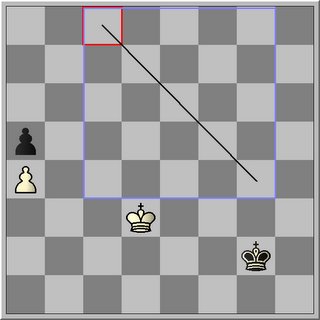
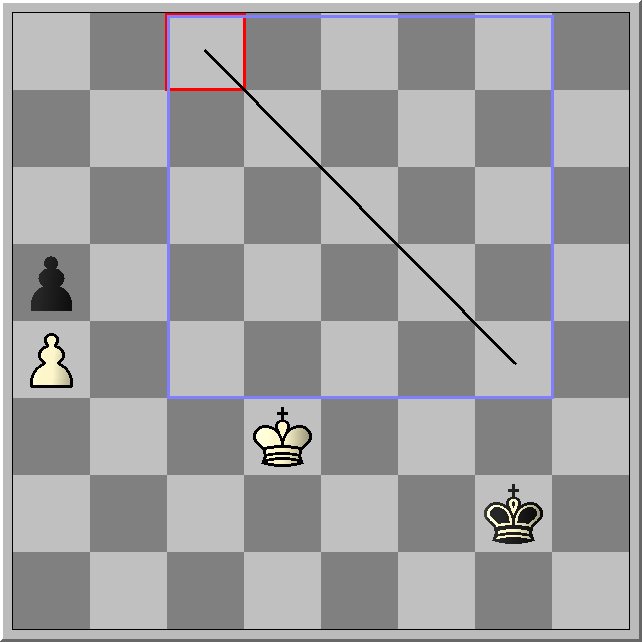
So with white to play black has only 4 moves to reach c8 because on the 5th move white will be on b7. Using the drawing method ''the square of the pawn' a square can be drawn starting from c8, showing the outer limits of this defense.
So the c-bishop file (3) + 4 moves = g-knight file (7) and for ranks we have 8 - 4 = 4. This shows you the square in one direction, in the direction of your black king.
Second defense is the lateral defense on the bishop file
If black manage to reach the bishops file, the move immediately following the capture of his own pawn by the hostile king, a draw can be obtained if his king is in direct opposition or in knight opposition towards his back rank (towards c8). This implies also that the square in lateral opposition should hold a draw.
In other words you should be at least on the same level of the bishop file with your king the move following the capturing of your pawn by the opponent's king.
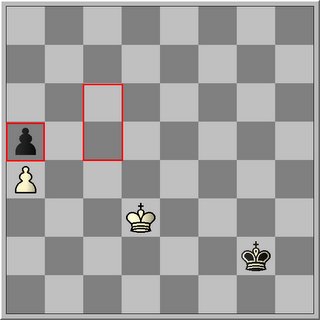
In our example the squares are c5 (same level) & c6. (this should also be true for c7)
It takes white 3 moves to capture the pawn on a5, so black has 3 moves to reach the bishops file at least at the level of c5. One thing you may not forget is that the minimal path of the black king may not be prolonged by the other king.
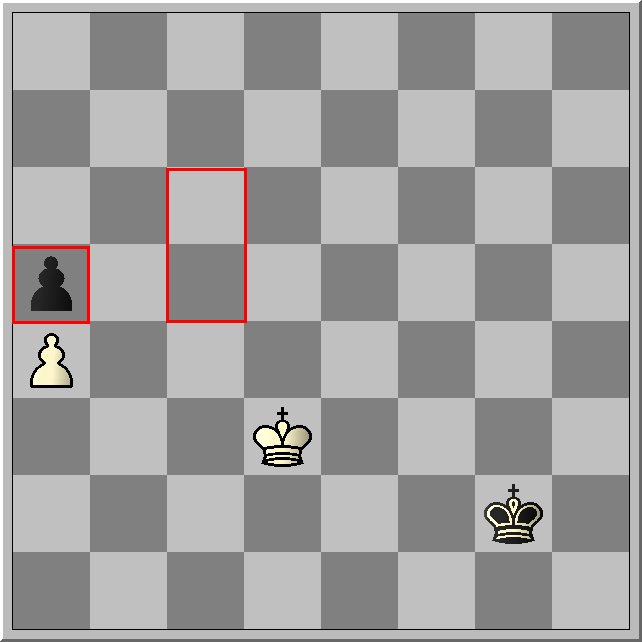
Using the drawing method ''the square of the pawn' a square can be drawn starting from c5, showing the outer limits of this defense in one direction.
Third defense is the capture of the opponent's pawn through the counter attack. I called this the destination square defense.
It basically comes down to the fact that black is nearer to white's pawn than white is to black's pawn. If white would be on b5 black would not be able to capture the pawn on a4. So if the distance of the black king is shorter to the white pawn than the distance between the white king and the target square b5, black can succesfully eliminate the pawn.
The target square is the square on the knight file aside your opponent's pawn or easily the square defended by your opponent's pawn.

As in our example it takes for white two moves to reach b5. With white to play black has only 1 move to capture the pawn. The pawn to be captured for black is standing on a4. So here only the immediate squares around a4 gives black this type of defense.
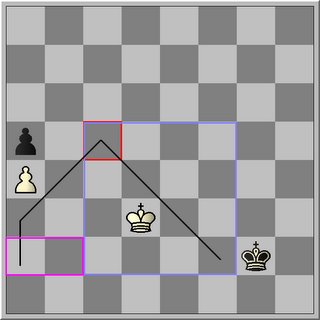
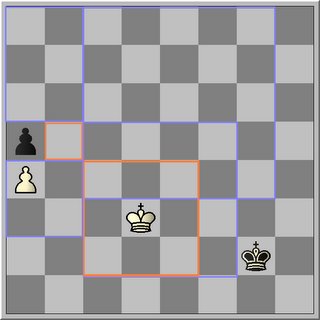
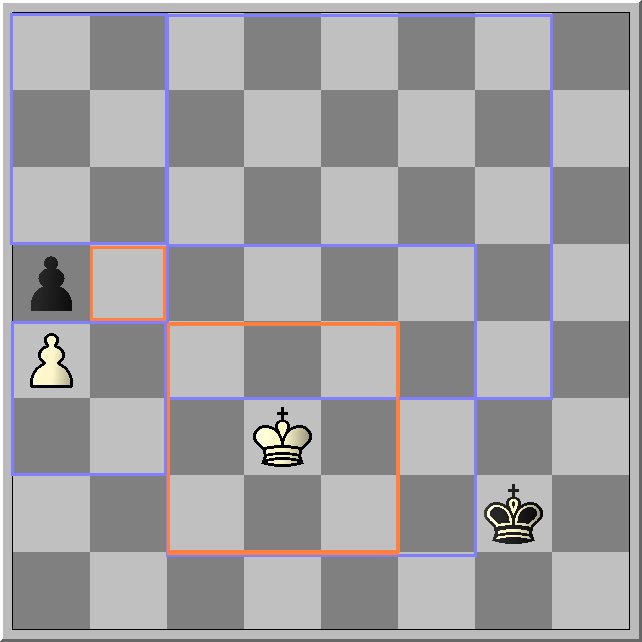
Putting all the pieces together the following overview can be deduced; orange squares are non-accessable as initial starting places for the black king. With black to play, black has to enter the purple region to draw. So on 1... Kg3 black looses, on 1...Kf3 or 1...Kf2 a draw follows correct play. With white to play black has to be within the purple region to draw. Depending on the black king's position one can easily see what kind of defense one has to follow to draw the game. Notice the squares are drawn in one direction. For c8 you can draw the sqaures in 2 directions from c5 in 4 directions. Where you have overlap of the squares both defenses (lateral or square defense) are available.
Furthermore a2 and b2 falls within the 3X3 square of c5 drawn to the lower Q-side of the board. The lateral defense is not working for these squares due the meeting hall effect. (both kings will be in close proximity when their paths cross, causing a prolonged path for the one of the kings)
Summary for the defender
1, Draw a line through the bishop file, draw a horizontal line through your own pawn. From the square of intersection towards your back rank square, these squares function as your target squares for a draw. By calculating the minimal path to these squares you can see in what positions you can for instance loose a move to obtain a draw or what kinds of defense you can use to draw. (lateral or square defense) Always watch out for interference caused by the crossing of both paths.- remember the meeting hall.
2, If your king happens to be near your opponents pawn it might be worthwhile to check if a direct capture is possible.
3. If the lateral file distance between both kings is equal to 2 , lateral defense will lead to a draw unless the rank distance between the kings is larger than 1. If the lateral file distance is larger than 2, lateral defense cannot be used to obtain a draw.
It is important to note that the king nearest to the blocked pawns can play for a win while the other one is bound to play for a draw.
When we have a blocked rook pawn position it is important to notice that there is no turtle position to save the pawn. Simply because no file exist beyond the h - or before the a - file. So it comes down to the fact that the pawn can only be attacked or defended by the (hostile) king from one side of the board.
Furthermore the position shows that the hostile king can only attack the pawn from behind or from aside. This gives the pawn 3 vulnerable squares (violet).
Let us have a closer look to the following example: a4Kd3a5Kg2

Your first question should be something like: what are the target squares black has to go for to obtain a draw? And not something like "How to judge this position"? because this implies you know the mechanisms and have a total overview.
Before you can judge this position you have to know what kind of defenses black has. Only through the knowledge of the draw positions you will see which target squares will become important. Once you know that it is a rat race to the right square. .
Black has general speaking two important means of defenses to draw the position? It does not mean that he has two ways to play the position but the type of defenses are related to the target squares black can play for.
First defense is the square defense.
The target square is c8 (= the square on the back rank on the bishop file). If black managed to be there first, it does not matter where the white king stands or whether he has captured the black pawn or not, a draw follows.
This shows immediately that for white his target square will be b7. If he occupies b7 black is shut off of his vital square. If white wants to queen his pawn, he is obliged to capture the black pawn to free the path of the white pawn.
For white to calculate the amount of moves to b7 = distance (white king - black pawn) + distance (black pawn - target square b7). The distance is being expressed in # moves necessary to reach the target square.
# moves = (d-file - a-file) + ( b7 - a5) = (4-1) + (7-5) = 5
For black to calculate the amount of moves to c8 = distance (black king position - c8)
# moves to c8 = (c8 -g2) = 8 - 2 = 6

From this knowledge one can easily draw the conclusion that black cannot draw the position through this defense. This would be true if both defenses (lateral or square defense) would be totally non-related items on the board. As previous shown there are many routes to the same square but only a few which covers the shortest path.
So with white to play black has only 4 moves to reach c8 because on the 5th move white will be on b7. Using the drawing method ''the square of the pawn' a square can be drawn starting from c8, showing the outer limits of this defense.
So the c-bishop file (3) + 4 moves = g-knight file (7) and for ranks we have 8 - 4 = 4. This shows you the square in one direction, in the direction of your black king.
Second defense is the lateral defense on the bishop file
If black manage to reach the bishops file, the move immediately following the capture of his own pawn by the hostile king, a draw can be obtained if his king is in direct opposition or in knight opposition towards his back rank (towards c8). This implies also that the square in lateral opposition should hold a draw.
In other words you should be at least on the same level of the bishop file with your king the move following the capturing of your pawn by the opponent's king.
In our example the squares are c5 (same level) & c6. (this should also be true for c7)
It takes white 3 moves to capture the pawn on a5, so black has 3 moves to reach the bishops file at least at the level of c5. One thing you may not forget is that the minimal path of the black king may not be prolonged by the other king.
Using the drawing method ''the square of the pawn' a square can be drawn starting from c5, showing the outer limits of this defense in one direction.

Third defense is the capture of the opponent's pawn through the counter attack. I called this the destination square defense.
It basically comes down to the fact that black is nearer to white's pawn than white is to black's pawn. If white would be on b5 black would not be able to capture the pawn on a4. So if the distance of the black king is shorter to the white pawn than the distance between the white king and the target square b5, black can succesfully eliminate the pawn.
The target square is the square on the knight file aside your opponent's pawn or easily the square defended by your opponent's pawn.
As in our example it takes for white two moves to reach b5. With white to play black has only 1 move to capture the pawn. The pawn to be captured for black is standing on a4. So here only the immediate squares around a4 gives black this type of defense.
Putting all the pieces together the following overview can be deduced; orange squares are non-accessable as initial starting places for the black king. With black to play, black has to enter the purple region to draw. So on 1... Kg3 black looses, on 1...Kf3 or 1...Kf2 a draw follows correct play. With white to play black has to be within the purple region to draw. Depending on the black king's position one can easily see what kind of defense one has to follow to draw the game. Notice the squares are drawn in one direction. For c8 you can draw the sqaures in 2 directions from c5 in 4 directions. Where you have overlap of the squares both defenses (lateral or square defense) are available.
Furthermore a2 and b2 falls within the 3X3 square of c5 drawn to the lower Q-side of the board. The lateral defense is not working for these squares due the meeting hall effect. (both kings will be in close proximity when their paths cross, causing a prolonged path for the one of the kings)
Summary for the defender
1, Draw a line through the bishop file, draw a horizontal line through your own pawn. From the square of intersection towards your back rank square, these squares function as your target squares for a draw. By calculating the minimal path to these squares you can see in what positions you can for instance loose a move to obtain a draw or what kinds of defense you can use to draw. (lateral or square defense) Always watch out for interference caused by the crossing of both paths.- remember the meeting hall.
2, If your king happens to be near your opponents pawn it might be worthwhile to check if a direct capture is possible.
3. If the lateral file distance between both kings is equal to 2 , lateral defense will lead to a draw unless the rank distance between the kings is larger than 1. If the lateral file distance is larger than 2, lateral defense cannot be used to obtain a draw.
It is important to note that the king nearest to the blocked pawns can play for a win while the other one is bound to play for a draw.
posted by Montse at 12:35 PM
![]()

1 Comments:
That's quite a piece of analysis!
Post a Comment
<< Home