Philidor -Part II
Let us consider the following position:
If we bring the white king on d5 instead on f5, pawn on e5.
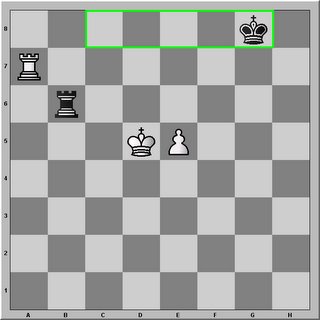
Now here we have a drawing zone which is 5 squares large. With the king on f5 instead we obtain een drawing zone of 3 squares.
So what is the reason for this small difference?
The main point is that the defender's rook is at the same side of the hostile King. This means that the white king cannot use the pawn as a shield and therefor is prevented to go directly to the sixth rank. So the white king will be forced to loose a tempo to attack the black rook.. This knowledge known by black that white has to loose a tempo to chase the black rook away, gives him an extra tempo to improve his king position.
So on 1. e6 follows Kf8! and NOT Rb1! as the latter allows white to move forward unhindered. So your first question after the pawn push to the sixth rank should be something like "Can he follow-up immediately with his king to the sixth rank".
If the answer is affirmative, your rook has to go down to attack him from behind. In this position you do not have the time anymore to use tempos to improve your king position.
The 3rd rank defence or Philidor comes down to:
- control of the square on the 7th rank in front of the pawn by the defender's king (to shield off the other king of a hiding place - orange square) together with
- a continous attack from behind by the defender's rook on the hostile king. As the hostile king is exposed he has no safe place to hide from the rook and hence from his checks.

Thus the relative position of both the hostile king versus the defender's rook (pink squares) determines if one has an extra spare tempo or not. Keep in mind that the hostile king must be able to chase away the defender's rook to the opposing side on the sixth rank or to a different rank.
If the defender's rook cannot be chased off, a draw immediately follows as the rook can move back or forward on the sixth rank. It takes too much tempos to bring the king to the other side of the pawn. Hence white can only win if black completely misplay the position.
To summarize
- If the defender's rook is on the same side of the pawn as the hostile king, the defender has a 5 square drawing zone for his king on the back rank. If you switch the rook to the otherside of the pawn the drawing zone will be reduced to the initial three squares in front of the pawn.
- The main task of the defender's king is to prevent the hostile king to have access to the square in front of the pawn on the 7th rank.
- The defender's rook moves down not on the idea when the pawn is pushed to the sixth rank, but rather on the fact if the king can move upward unhindered the next tempo to join the pawn.
posted by Montse at 3:33 PM
![]()

2 Comments:
i finally just found your most excellent blog thru blueDevil. this is outstanding. i am adding you to my links.
im very serious a very serious student of both tactics (hosted and CD), and endings (offline via books).
daily im assiduous on both ctArt3.0 partial 2nd circle (2040 elo; more on this at my post) and chessTacticalServer, or chess.emrald.net (15,001 at 1530 elo 83.61% correct).
im pretty eclectic at my blog but it always reverts to chess. im average in chess but love study and blogging here. thank you.
warm regards, david seattle
Hey David,
Nice hearing from you. I am looking forward to read your blog. What is stopping me? See you around
Post a Comment
<< Home