Philidor - Defending rook & attacking king on opposing side
I wanted to know in which Philidor-like positions the game is a draw and in which the game would lead to a loss. In most endgame books which handle the Philidor position the author limits himself to consider only one position to explain the mechanism. And with this you have to do it. There are no general rules, no background to be found which explains what are the main points to focus on. Does it matter if the attacking King is on the same side as the defending rook in respect to the pawn? How far can the defending King be moved on the back rank to the right or to the left from its ideal position? etc...
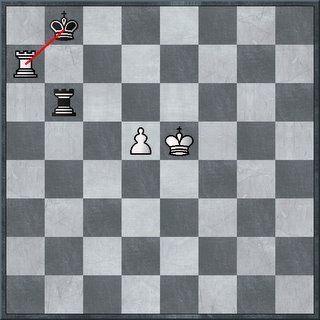
Consider the following position

Black has just played 1... Rb6, cutting off the march of the white king. The main idea of this defense is to prevent the king of moving upwards forcing him either to play with the rook or with the pawn.
Playing with the rook does not help white to make any progress as black has sufficient resources to keep the position equal.
Moving the rook up and down between the seventh and the back rank gives black just a check and repetition of moves will soon follow, leading to a draw (1.Ra8+ Ke7 2.Ra7+ Ke8 3. etc)
Pushing the pawn to the sixth rank (e5-e6), will force the rook down again to the first (Rb1),2nd (Rb2), 3rd (Rb3) or 4th rank (Rb4). The main idea here is to check the king as the attacking king cannot hide behind the pawn and hence is exposed to constant checks from behind. (e7 is being controlled by the black king)
In the Philidor position above(Rook versus Rook + pawn) the defending king on the back rank should be in front of the pawn.
The attacking rook is on the 7th rank, defending rook on the sixth rank and attacking king & pawn on the fifth rank aside each other.
This is the most ideal position. It is important to notice that in the above position the black rook is not at the same side in respect to the pawn than the attacking king. It makes a small difference but a crucial one with respect to the drawing area of the black king.
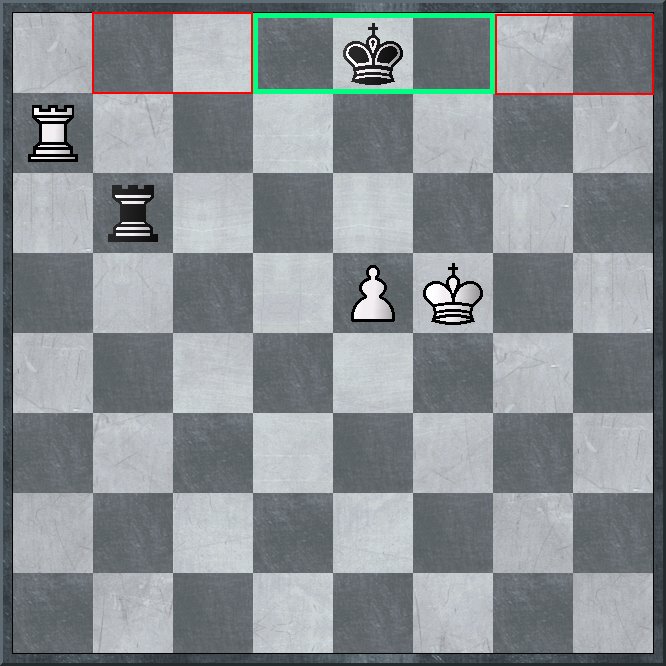
Let us first designate the area where just moving the black king (defending) still holds a draw.
The green rectangle shows the position where the king has to be (white's turn) or to enter (black's turn) depending on who has the move. Clearly, the possibilities are limited.

If white can push the pawn to the sixth rank before black king can be in the green area than the loss will be inevitable.
So if white plays e5-e6, the black king has to be either on f8,e8 or d8 square to hold the draw. On g8, h8, c8 black can not avoid loosing. When the black king is on b8 e5-e6 will lead to draw. The immediate capture of white 's rook does not change anything to the result. The pawn becomes unstoppable. So black will be forced to exchange the rook for the pawn.
But if white move his rook first into safety (for instance to h7) he wins!
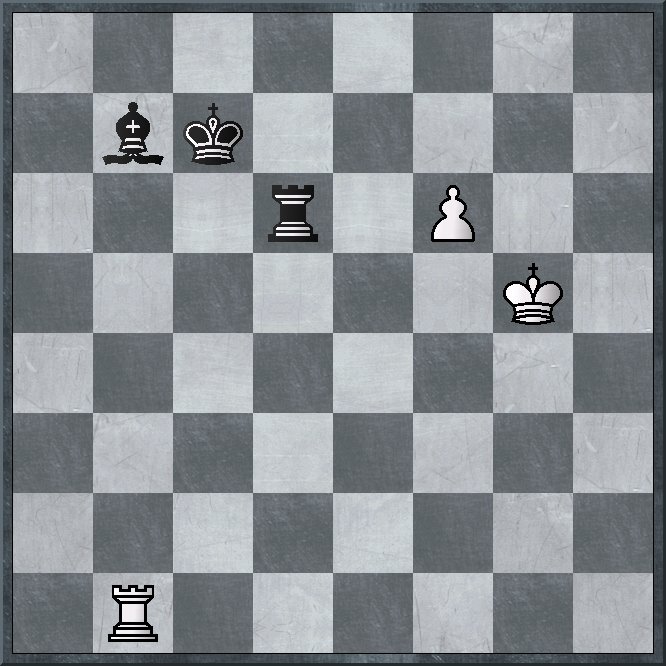
Let's move the initial position king-pawn one to the left and placing the black king out of the green rectangle area.

Again the 3 positions appear where one can have a draw. Putting the black king on f8, g8 or h8 looses immediately.
So what about b8, If I bring the black king on b8 will this be a draw or a loss?
By comparing both positions we see that in both cases black threatens to capture white's rook on a7. In the latter if white brings his rook in safety, black can use the tempo to enter the green area. In the former (with pawn on e5) the extra tempo is not enough as the black king is still outside the green area. (Black's king will strand on c8 as the green area holds the squares d8, e8, f8)
So in the latter with black to play, black can step outside the green area attacking white's rook, and than move again into the green area when white has brought his rook into safety.
Now comes the question when can white safely loose his rook and still force a draw?
When the initial distance between his rook and pawn equals 4 (5(=e-file)-1 (a-file))he can safely loose his rook. Keeping in mind that the white king is on the opposing side and already on the fifth rank and his pawn on the sixth rank!
This might be quite handy if you have to make a capture on a7 followed by a recapture of your rook by the black king. Now you know that in this position K+R versus K+P there is still a draw present. Don't play this if you don't have to give up your rook as you otherwise through away the game.
Let's consider the following position
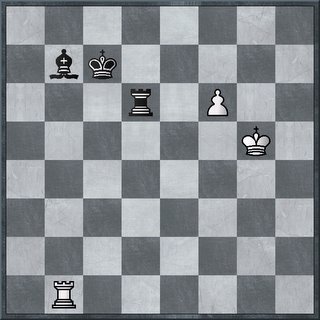
White draws with 1.Rxb7! Kxb7 (forced) 2.Kg6 =
Summary: Attacking King and defending rook on opposing side
In general: The defending King must be in direct or knight opposition to the square in front of the pawn to hold the draw. He can afford to step outside the drawing zone if he can recover this loss tempo on the next move to step inside the D-zone again(for instance by attacking the rook).
Consider the following position

Black has just played 1... Rb6, cutting off the march of the white king. The main idea of this defense is to prevent the king of moving upwards forcing him either to play with the rook or with the pawn.
Playing with the rook does not help white to make any progress as black has sufficient resources to keep the position equal.
Moving the rook up and down between the seventh and the back rank gives black just a check and repetition of moves will soon follow, leading to a draw (1.Ra8+ Ke7 2.Ra7+ Ke8 3. etc)
Pushing the pawn to the sixth rank (e5-e6), will force the rook down again to the first (Rb1),2nd (Rb2), 3rd (Rb3) or 4th rank (Rb4). The main idea here is to check the king as the attacking king cannot hide behind the pawn and hence is exposed to constant checks from behind. (e7 is being controlled by the black king)
In the Philidor position above(Rook versus Rook + pawn) the defending king on the back rank should be in front of the pawn.
The attacking rook is on the 7th rank, defending rook on the sixth rank and attacking king & pawn on the fifth rank aside each other.
This is the most ideal position. It is important to notice that in the above position the black rook is not at the same side in respect to the pawn than the attacking king. It makes a small difference but a crucial one with respect to the drawing area of the black king.
Let us first designate the area where just moving the black king (defending) still holds a draw.
The green rectangle shows the position where the king has to be (white's turn) or to enter (black's turn) depending on who has the move. Clearly, the possibilities are limited.
If white can push the pawn to the sixth rank before black king can be in the green area than the loss will be inevitable.
So if white plays e5-e6, the black king has to be either on f8,e8 or d8 square to hold the draw. On g8, h8, c8 black can not avoid loosing. When the black king is on b8 e5-e6 will lead to draw. The immediate capture of white 's rook does not change anything to the result. The pawn becomes unstoppable. So black will be forced to exchange the rook for the pawn.
But if white move his rook first into safety (for instance to h7) he wins!
Let's move the initial position king-pawn one to the left and placing the black king out of the green rectangle area.

Again the 3 positions appear where one can have a draw. Putting the black king on f8, g8 or h8 looses immediately.
So what about b8, If I bring the black king on b8 will this be a draw or a loss?
By comparing both positions we see that in both cases black threatens to capture white's rook on a7. In the latter if white brings his rook in safety, black can use the tempo to enter the green area. In the former (with pawn on e5) the extra tempo is not enough as the black king is still outside the green area. (Black's king will strand on c8 as the green area holds the squares d8, e8, f8)
So in the latter with black to play, black can step outside the green area attacking white's rook, and than move again into the green area when white has brought his rook into safety.

Now comes the question when can white safely loose his rook and still force a draw?
When the initial distance between his rook and pawn equals 4 (5(=e-file)-1 (a-file))he can safely loose his rook. Keeping in mind that the white king is on the opposing side and already on the fifth rank and his pawn on the sixth rank!
This might be quite handy if you have to make a capture on a7 followed by a recapture of your rook by the black king. Now you know that in this position K+R versus K+P there is still a draw present. Don't play this if you don't have to give up your rook as you otherwise through away the game.
Let's consider the following position
White draws with 1.Rxb7! Kxb7 (forced) 2.Kg6 =
Summary: Attacking King and defending rook on opposing side
In general: The defending King must be in direct or knight opposition to the square in front of the pawn to hold the draw. He can afford to step outside the drawing zone if he can recover this loss tempo on the next move to step inside the D-zone again(for instance by attacking the rook).
posted by Montse at 7:01 AM
![]()

4 Comments:
John Nunn has written Secrets of Rookendings, with all(!) K+R vs K+R+p
I have it, but it is tough to study.
It sure is a big book but I doubt that he handles all positions, only key positions, I think. Now try this one. put the black king on g5. Switch white's king from d5 to f5.
Same positions of the rook as in diagrams and pawn on e5.
White to move. lol
Black king on g8
Montse: this is very helpful stuff. I have been reading about Lucina/Philidor and it is exactly as you say: all the books give one position to try to make a general claim. It seems chess authors are a lazy bunch: they could do so much more. The job of a good author is to minimize the amount of work you have to put in to understand what they've done. It is clear that many chess authors don't do that (note this doesn't mean we shouldn't have to work ourselves to understand the positions, etc., but come on).
You and Tempo should write a book on basic endgame theory.
Post a Comment
<< Home