Into the gray area
Last game was a great fight. I barely won as white when I defenitely made a mistake in the opening. It was time for revenge.
My opponent invites me to play the evans gambit. (1.e4 e5 2.Nf3 Nc6 3.Bc4 Bc5 4.b4) I think you can snatch the pawn but this will accelerate white's development. c3, sooner or later he will follow up with Qb3 with the idea of attacking f7 and b7.The square f7 will be hard to defend and this was not my cup of tea. Well I'll make it coffee. So I decided to play Be7 and see what kind of storm will hit me. 'Hit me, Hit me, hit Meeeeeeeeeeeeeeee'. This must be from a song.

Snatching the pawn may lead to 4...Bxb4 5.c3 Be7 6.Qb3 Na5 7.Bxf7+ Kf8 8.Qa4! Nc6 9.Bd5 Nf6 10.d3 (+/-)
So I want to avoid that my king is being stuck in the middle of the board and being the rest of the game a target to be shot at. So I played Be7 and comforted my self with the fact that this move was not bad. If there exist an accepted version there must be also a declined version. So let's go for this one.
5.Bb2 d6 6.d4 exd4 7.Nxd4 Nxd4 8.Bxd4 Nf6
My opponent develops with the intention to put my kingside under heavy pressure and quickly opens the center. I play along. White obtains an active position but black is solid.
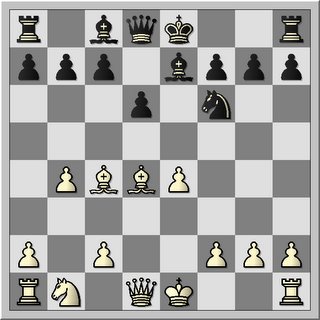
What might be the plan of white here?
9.Nd2 0-0 10.0-0
White is one move away to complete his development.
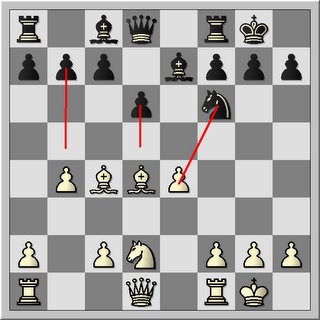
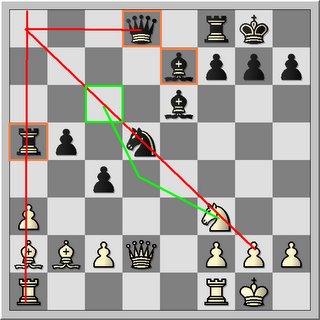
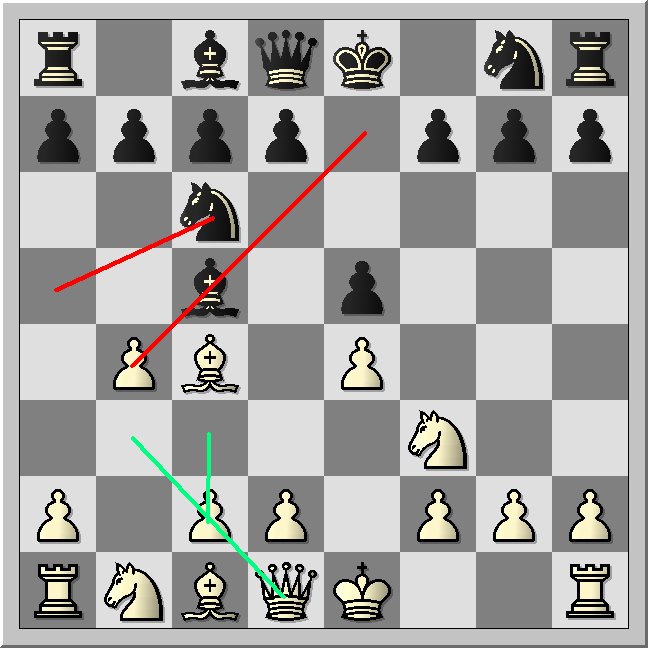
So I counter-attack through the center with 10. ...d5
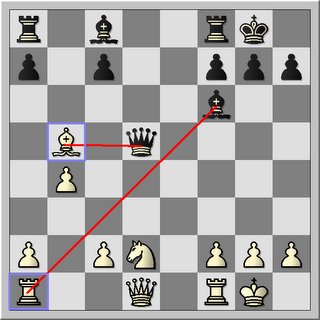
10. d5 11.exd5 b5!? 12.Bb3 Nxd5
My opponent did not dare to take the pawn coz of a double attack of the Queen on his two bishops. At first it looks strong for black, but it is not! Apparently he did not know how to break the double attack. Neither was I fully aware of the fact that the idea I played, was absolutely not waterproof. It would eventually lead to a loss of a pawn, although at first glance it looked fine. This is an interesting point to notice.
Let's have a closer look to the accepted variation
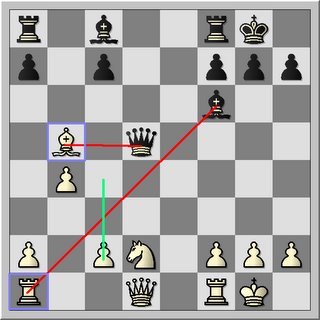
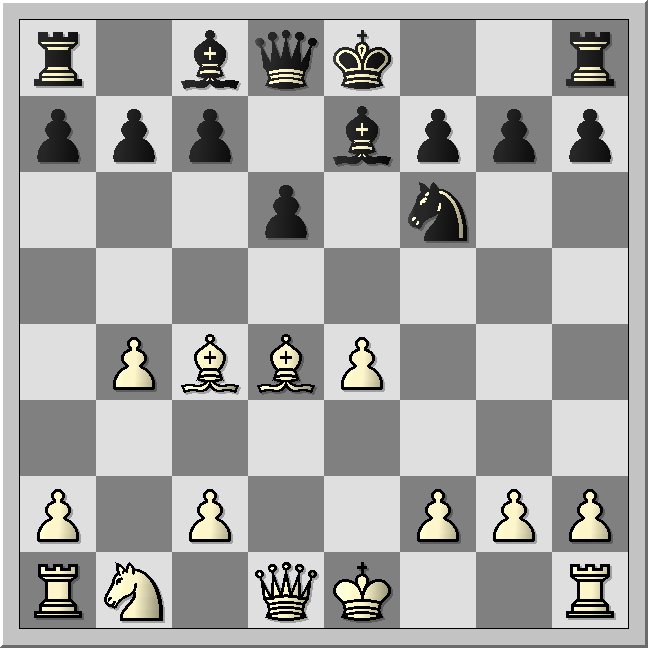
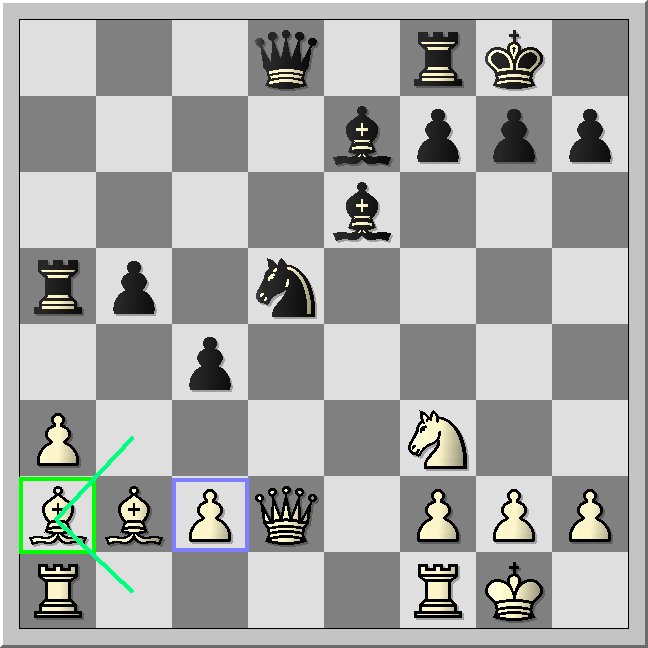
11.exd5 b5 12.Bxb5 Qxd5
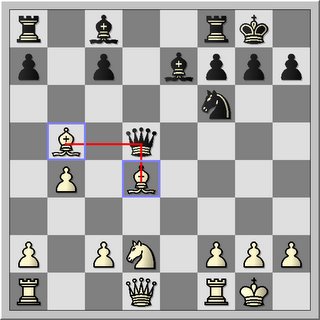
The Queen attacks the two bishops simultaneously. How to defend?
When a piece is attacked the following defenses are possible
1. move away the attacked piece
2. capture the attacking piece (exchange)
3. defend the attacked piece (covering move)
4. counter-attack with a greater threat: for example attack a higher ranked piece or mate threat
5. put a piece in between if possible
Did I forget one?
In a double attack combinations of these basic mechanisms are necessary to deal with the threat. But one has also a couple of extra defenses.
For instance in some cases the pin or a check might be enough to break the double attack.
So how to find the correct response?
1. Which pieces are being attacked? Both bishops
2. Can I capture the attacker? No
3. Can I move away, covering or put something in between?
4. Can I counter-attack with a greater threat,give check with a threatenend piece or pin the attacking piece? Do I have a mating threat?
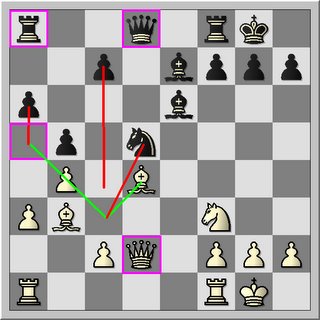
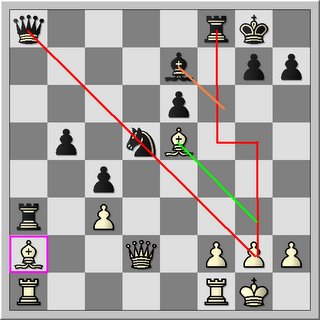
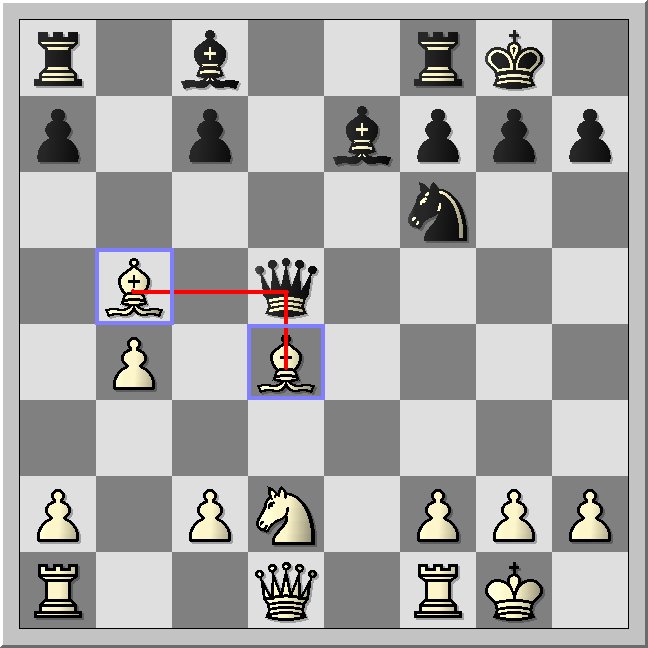
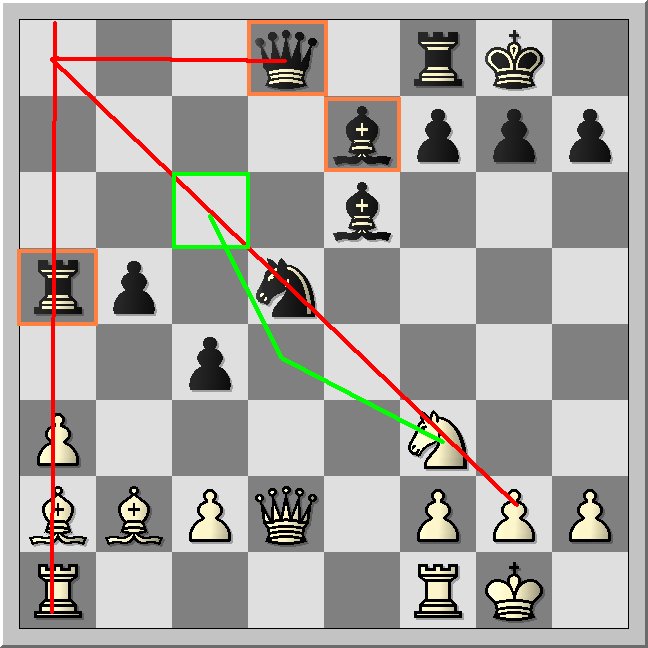
What white can do and something which I was not fully aware of during play was the exchange of a threatened piece for an equal piece. I noticed the exchange and was content with a renewed threat to the rook a1. But here comes the clue. White is able to break both threats!!! The Q-threat against the bishop and the bishop threat against the rook. And this was not forseen. If he had accepted and played correctly it would have been time for another beer.
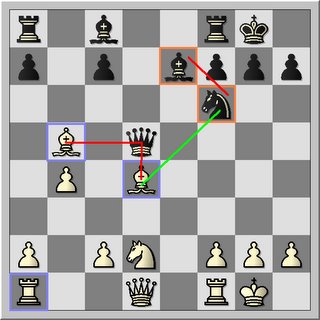
In orange we see the defense of the black pieces but also its connection. White exchanges his dark squared bishop for the knight. The attack of the Q on white's light squared bishop becomes impossible. Black is trapped in a kind of forced sequence due to the fact if black does not respond to the capture by recapturing the bishop he might end up loosing 2 pieces for one. If the queen takes, white respond by capturing the bishop on e7 and threatening the rook.
So black is forced to take the dark squared bishop. With this move he renews his attack on white's pieces. Black is now threating the capture of the rook on a1 or the light squared bishop.
13.Bxf6 Bxf6
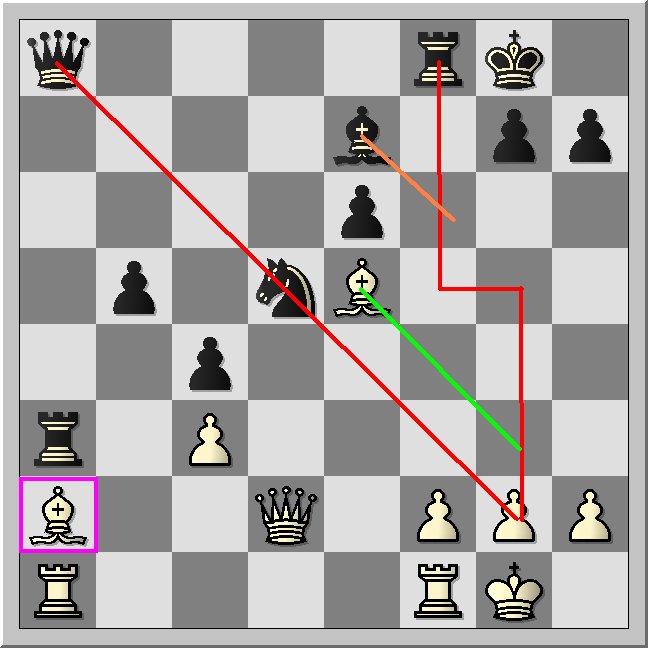
How to break the attack on both pieces?
By creating a counter-attack with a greater threat.
Playing Bc4 is not good enough as black will follow up with Qd4, white has a forced rook move and Rd8 eyeing Bc4 and Nd2. The Knight on d2 cannot be defended and moving the knight will lead to a loss of the bishop.
14.Bc4 Qd4 15.Rc1 Rd8 (-+ winning N or B)
or
14.Bc4 Qd4 15.Qe2 Bg4 16.Qd3 Qxd3 17 Bxd3 BxRa1 (exchange up) -+
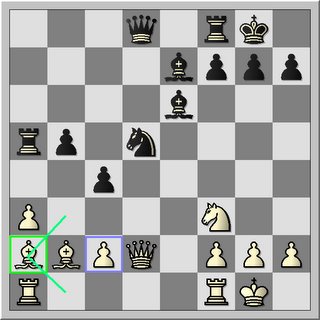
To find the answer you have to remember that the queen is a lady. Now she doesn't like to socialize with peasants. So move the pawn to c4!!!
This is the move that flaws Black's little combination. By playing c4 you are creating an attack against the Q and at the same time protects the light squared bishop.
So now for instance 14. c4! Qd4 15.Rc1 Rd8 16. Nf3 or 15.Qe2 white has a slight advantage. Although black is a pawn down, his activity (bishop pair) momentarily is compensating for the loss of the pawn.
So I might have fallen victim of my own combination. It is a lovely example of multiply times breaking double threats.
Now back to the game.
My opponent could not see that far. So he decided differently. He choose to play 12.Bb3
12.Bb3 Nxd5 13.Nf3 Be6 14.a3 a6
I eliminated the center pawn although b4 could also be directly eliminated. My opponent played 13.Nf3. Here I hesitated, to grab the pawn on b4 or not. The thing is I reasonend that If I took, my knight would be totally relocated on the Q-side of the board. This meant that my best defender of king position would not be on time if troubles starts; So I kept my knight in the center. Justified or not at that time it looked reasonable not to be too greedy as I noticed he was relocating his knight to the kingside. I played a developing moving Be6 instead. My opponent played a3 and know I could not found any immediate weakness in his position to exploit. I played a waiting move a6. In this position I had really no idea what to play and it looked pretty much equal. So I decided not to disturb the balance too much.
15.Qd2 a5 16.bxa5 c5 17.Bb2 c4 18.Ba2 Rxa5
My opponent activated his Q and with this I decided to play for a little trick. I played a5!? My opponent fell for the trap and took the pawn. My primary concern was to neutralize the activity of one of his bishops. Having both bishops aimed at my kingside was not comfortable at all. Giving up my 'a'-pawn would free the path of my c-pawn and with tempo I might push it down the file and block the activity of one of his bishops. This I would consider a good thing.
I noticed that if he would capture my a-pawn I could recover the pawn afterwards as he cannot defend it adequately. His dark squarted Bishop cannot go through c3 to protect a5 nor can he play b6 attacking the queen. So the pawn can be recovered as it is twice being attacked by black and only once defended by white.
For instance 15.Qd2 a5 16.bxa5 c5 17.Be3 c4 18.Bb6? Nxb6 19. axb6 cxBb3 (-+)loosing a piece
Obtaining eventually this position, I knew that I had a big advantage.
Due to a lack of mobility his light-squared bishop is in big trouble. It is a matter of increasing the pressure on the Q-side before the bubble eventually will burst.
Relocating the light squared bishop will be at the expense of a couple tempi and might go through the back rank. This means that his rooks will be temporarily out of connection unless he decides to move the a-rook towards the center. The drawback of this move is his weakness along the a-file.
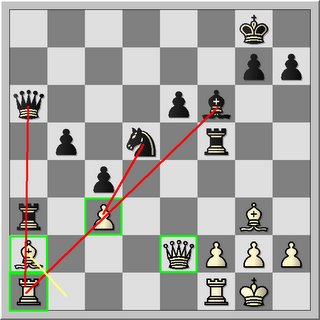
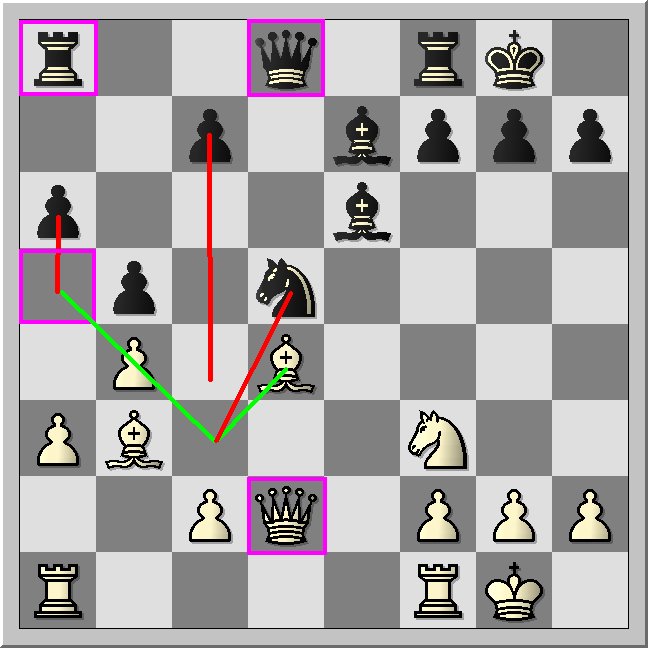
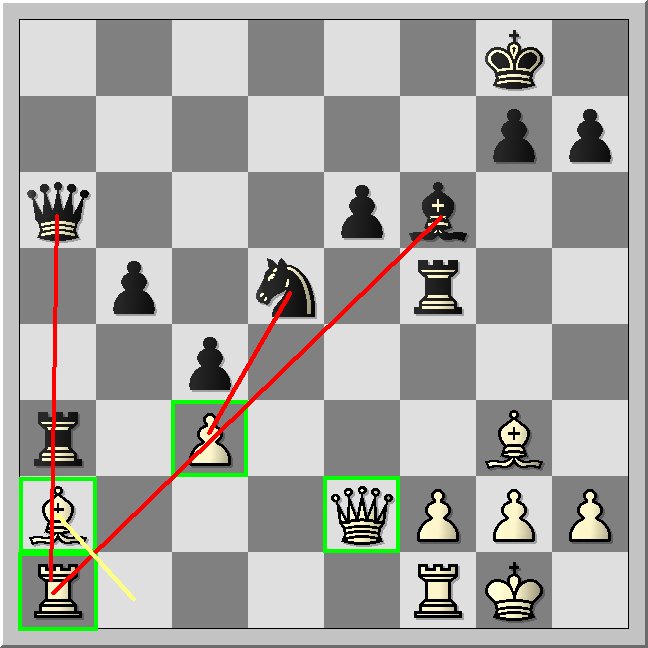
19.Nd4 Qa8 20.Nxe6 fxe6 21.Be5 Rxa3 22.c3 Rf5 23.Bg3 Bf6
My opponent went for a simple fork on c6 (see attacked squares in orange), probably hoping I would not see it. By playing Nd4 he reinforced my idea of playing Qa8. Now black is really pressuring white along the a-file. He decided to trade off his knight for my bishop. With this he actually activates my rook on the f-file, increasing the pressure on his position. (Keeping in mind that the Queen on a8 has an eye on his kingside). Eventually he decides to activate his bishop and to give his a-pawn away. I gladly accept his offer.
Now the pressure on the light squared bishop is real and his rook is cornered to the a1 square for defense of the bishop. All that black has to do is to increase the pressure and the nut will explode. His rook is a sitting duck.
22.c3 (diagram) Rf5!? 23.Bg3 Bf6
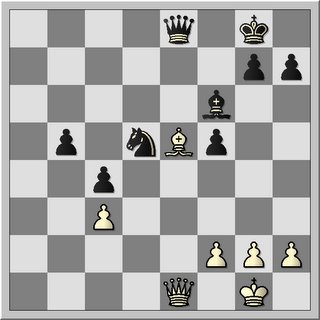
White closes the diagonal and in this way protects the bishop on a2 twice. Seemingly white is holding on. It is time to exploit a second weakness: The kingside.
With Rf5 my idea was to pressurize his Bishop to make a decision. Protecting the kingside or remain on the diagonal and protect the c-pawn; the menace of the rook lift (the possibility to swing my rook to the g-file + Qa8) made him protect his g-pawn. With this the protection along the a1-h8 file disappeared and I could post my bishop on f6.
Now where was the duck again?
24.Qe2 Qa6
My opponent tries Qe2 with the idea of capture e6 with check, I defend but keeping the pressure alive.
25.Bb1 Rxa1 26.Bxf5 Rxf1+ 27.Qxf1 exf5 28.Qe1 Qc6 29.Be5 Qe8 0-1
The game ends in a pin
Whole game
1.e4 e5 2.Nf3 Nc6 3.Bc4 Bc5 4.b4 Be7 laatste zet uit boek [4...Bxb4 5.c3 Be7 6.Qb3 Na5 7.Bxf7+ Kf8 8.Qa4 Nc6 9.Bd5 Nf6 10.d3] 5.Bb2 d6 6.d4 exd4 7.Nxd4 Nxd4 8.Bxd4 Nf6 9.Nd2 0-0 10.0-0 d5 11.exd5 b5 12.Bb3 Nxd5 13.Nf3 Be6 14.a3 a6 15.Qd2 a5 16.bxa5 c5 17.Bb2 c4 18.Ba2 Rxa5 19.Nd4 Qa8 20.Nxe6 fxe6 21.Be5 [-2.29 Fritz 7: 21.Rad1 Bf6 22.c3 Bxc3 23.Bxc3 Nxc3 24.Bxc4 Nxd1 25.Bxe6+ Kh8 26.Rxd1 Rxa3 -1.37/9 ] 21...Rxa3 22.c3 Rf5 23.Bg3 [-3.85 Fritz 7: 23.Qe2 -2.53/9 ] 23...Bf6 24.Qe2 Qa6 25.Bb1 [-6.72 Fritz 7: 25.Bxc4 Rxa1 26.Bxb5 Rxf1+ 27.Qxf1 Qa8 28.Qe1 Qc8 29.c4 -4.21/10 ] 25...Rxa1 26.Bxf5 Rxf1+ 27.Qxf1 exf5 28.Qe1 Qc6 29.Be5 [-10.88 Fritz 7: 29.Bd6 Nxc3 30.Qe6+ Kh8 31.Qf7 h6 32.Qf8+ Kh7 33.h3 Qe4 34.Kh2 Be5+ 35.g3 Bxd6 36.Qxd6 -6.62/11 ] 29...Qe8-+ 0-1
Chess games are never won! Chess games may only be lost!
My opponent invites me to play the evans gambit. (1.e4 e5 2.Nf3 Nc6 3.Bc4 Bc5 4.b4) I think you can snatch the pawn but this will accelerate white's development. c3, sooner or later he will follow up with Qb3 with the idea of attacking f7 and b7.The square f7 will be hard to defend and this was not my cup of tea. Well I'll make it coffee. So I decided to play Be7 and see what kind of storm will hit me. 'Hit me, Hit me, hit Meeeeeeeeeeeeeeee'. This must be from a song.
Snatching the pawn may lead to 4...Bxb4 5.c3 Be7 6.Qb3 Na5 7.Bxf7+ Kf8 8.Qa4! Nc6 9.Bd5 Nf6 10.d3 (+/-)
So I want to avoid that my king is being stuck in the middle of the board and being the rest of the game a target to be shot at. So I played Be7 and comforted my self with the fact that this move was not bad. If there exist an accepted version there must be also a declined version. So let's go for this one.
5.Bb2 d6 6.d4 exd4 7.Nxd4 Nxd4 8.Bxd4 Nf6
My opponent develops with the intention to put my kingside under heavy pressure and quickly opens the center. I play along. White obtains an active position but black is solid.
What might be the plan of white here?
9.Nd2 0-0 10.0-0
White is one move away to complete his development.

So I counter-attack through the center with 10. ...d5
10. d5 11.exd5 b5!? 12.Bb3 Nxd5
My opponent did not dare to take the pawn coz of a double attack of the Queen on his two bishops. At first it looks strong for black, but it is not! Apparently he did not know how to break the double attack. Neither was I fully aware of the fact that the idea I played, was absolutely not waterproof. It would eventually lead to a loss of a pawn, although at first glance it looked fine. This is an interesting point to notice.
Let's have a closer look to the accepted variation
11.exd5 b5 12.Bxb5 Qxd5
The Queen attacks the two bishops simultaneously. How to defend?
When a piece is attacked the following defenses are possible
1. move away the attacked piece
2. capture the attacking piece (exchange)
3. defend the attacked piece (covering move)
4. counter-attack with a greater threat: for example attack a higher ranked piece or mate threat
5. put a piece in between if possible
Did I forget one?
In a double attack combinations of these basic mechanisms are necessary to deal with the threat. But one has also a couple of extra defenses.
For instance in some cases the pin or a check might be enough to break the double attack.
So how to find the correct response?
1. Which pieces are being attacked? Both bishops
2. Can I capture the attacker? No
3. Can I move away, covering or put something in between?
4. Can I counter-attack with a greater threat,give check with a threatenend piece or pin the attacking piece? Do I have a mating threat?
What white can do and something which I was not fully aware of during play was the exchange of a threatened piece for an equal piece. I noticed the exchange and was content with a renewed threat to the rook a1. But here comes the clue. White is able to break both threats!!! The Q-threat against the bishop and the bishop threat against the rook. And this was not forseen. If he had accepted and played correctly it would have been time for another beer.

In orange we see the defense of the black pieces but also its connection. White exchanges his dark squared bishop for the knight. The attack of the Q on white's light squared bishop becomes impossible. Black is trapped in a kind of forced sequence due to the fact if black does not respond to the capture by recapturing the bishop he might end up loosing 2 pieces for one. If the queen takes, white respond by capturing the bishop on e7 and threatening the rook.
So black is forced to take the dark squared bishop. With this move he renews his attack on white's pieces. Black is now threating the capture of the rook on a1 or the light squared bishop.
13.Bxf6 Bxf6

How to break the attack on both pieces?
By creating a counter-attack with a greater threat.
Playing Bc4 is not good enough as black will follow up with Qd4, white has a forced rook move and Rd8 eyeing Bc4 and Nd2. The Knight on d2 cannot be defended and moving the knight will lead to a loss of the bishop.
14.Bc4 Qd4 15.Rc1 Rd8 (-+ winning N or B)
or
14.Bc4 Qd4 15.Qe2 Bg4 16.Qd3 Qxd3 17 Bxd3 BxRa1 (exchange up) -+
To find the answer you have to remember that the queen is a lady. Now she doesn't like to socialize with peasants. So move the pawn to c4!!!
This is the move that flaws Black's little combination. By playing c4 you are creating an attack against the Q and at the same time protects the light squared bishop.
So now for instance 14. c4! Qd4 15.Rc1 Rd8 16. Nf3 or 15.Qe2 white has a slight advantage. Although black is a pawn down, his activity (bishop pair) momentarily is compensating for the loss of the pawn.

So I might have fallen victim of my own combination. It is a lovely example of multiply times breaking double threats.
Now back to the game.
My opponent could not see that far. So he decided differently. He choose to play 12.Bb3
12.Bb3 Nxd5 13.Nf3 Be6 14.a3 a6
I eliminated the center pawn although b4 could also be directly eliminated. My opponent played 13.Nf3. Here I hesitated, to grab the pawn on b4 or not. The thing is I reasonend that If I took, my knight would be totally relocated on the Q-side of the board. This meant that my best defender of king position would not be on time if troubles starts; So I kept my knight in the center. Justified or not at that time it looked reasonable not to be too greedy as I noticed he was relocating his knight to the kingside. I played a developing moving Be6 instead. My opponent played a3 and know I could not found any immediate weakness in his position to exploit. I played a waiting move a6. In this position I had really no idea what to play and it looked pretty much equal. So I decided not to disturb the balance too much.
15.Qd2 a5 16.bxa5 c5 17.Bb2 c4 18.Ba2 Rxa5
My opponent activated his Q and with this I decided to play for a little trick. I played a5!? My opponent fell for the trap and took the pawn. My primary concern was to neutralize the activity of one of his bishops. Having both bishops aimed at my kingside was not comfortable at all. Giving up my 'a'-pawn would free the path of my c-pawn and with tempo I might push it down the file and block the activity of one of his bishops. This I would consider a good thing.
I noticed that if he would capture my a-pawn I could recover the pawn afterwards as he cannot defend it adequately. His dark squarted Bishop cannot go through c3 to protect a5 nor can he play b6 attacking the queen. So the pawn can be recovered as it is twice being attacked by black and only once defended by white.
For instance 15.Qd2 a5 16.bxa5 c5 17.Be3 c4 18.Bb6? Nxb6 19. axb6 cxBb3 (-+)loosing a piece
Obtaining eventually this position, I knew that I had a big advantage.
Due to a lack of mobility his light-squared bishop is in big trouble. It is a matter of increasing the pressure on the Q-side before the bubble eventually will burst.
Relocating the light squared bishop will be at the expense of a couple tempi and might go through the back rank. This means that his rooks will be temporarily out of connection unless he decides to move the a-rook towards the center. The drawback of this move is his weakness along the a-file.
19.Nd4 Qa8 20.Nxe6 fxe6 21.Be5 Rxa3 22.c3 Rf5 23.Bg3 Bf6
My opponent went for a simple fork on c6 (see attacked squares in orange), probably hoping I would not see it. By playing Nd4 he reinforced my idea of playing Qa8. Now black is really pressuring white along the a-file. He decided to trade off his knight for my bishop. With this he actually activates my rook on the f-file, increasing the pressure on his position. (Keeping in mind that the Queen on a8 has an eye on his kingside). Eventually he decides to activate his bishop and to give his a-pawn away. I gladly accept his offer.
Now the pressure on the light squared bishop is real and his rook is cornered to the a1 square for defense of the bishop. All that black has to do is to increase the pressure and the nut will explode. His rook is a sitting duck.
22.c3 (diagram) Rf5!? 23.Bg3 Bf6
White closes the diagonal and in this way protects the bishop on a2 twice. Seemingly white is holding on. It is time to exploit a second weakness: The kingside.
With Rf5 my idea was to pressurize his Bishop to make a decision. Protecting the kingside or remain on the diagonal and protect the c-pawn; the menace of the rook lift (the possibility to swing my rook to the g-file + Qa8) made him protect his g-pawn. With this the protection along the a1-h8 file disappeared and I could post my bishop on f6.
Now where was the duck again?
24.Qe2 Qa6
My opponent tries Qe2 with the idea of capture e6 with check, I defend but keeping the pressure alive.
25.Bb1 Rxa1 26.Bxf5 Rxf1+ 27.Qxf1 exf5 28.Qe1 Qc6 29.Be5 Qe8 0-1

The game ends in a pin
Whole game
1.e4 e5 2.Nf3 Nc6 3.Bc4 Bc5 4.b4 Be7 laatste zet uit boek [4...Bxb4 5.c3 Be7 6.Qb3 Na5 7.Bxf7+ Kf8 8.Qa4 Nc6 9.Bd5 Nf6 10.d3] 5.Bb2 d6 6.d4 exd4 7.Nxd4 Nxd4 8.Bxd4 Nf6 9.Nd2 0-0 10.0-0 d5 11.exd5 b5 12.Bb3 Nxd5 13.Nf3 Be6 14.a3 a6 15.Qd2 a5 16.bxa5 c5 17.Bb2 c4 18.Ba2 Rxa5 19.Nd4 Qa8 20.Nxe6 fxe6 21.Be5 [-2.29 Fritz 7: 21.Rad1 Bf6 22.c3 Bxc3 23.Bxc3 Nxc3 24.Bxc4 Nxd1 25.Bxe6+ Kh8 26.Rxd1 Rxa3 -1.37/9 ] 21...Rxa3 22.c3 Rf5 23.Bg3 [-3.85 Fritz 7: 23.Qe2 -2.53/9 ] 23...Bf6 24.Qe2 Qa6 25.Bb1 [-6.72 Fritz 7: 25.Bxc4 Rxa1 26.Bxb5 Rxf1+ 27.Qxf1 Qa8 28.Qe1 Qc8 29.c4 -4.21/10 ] 25...Rxa1 26.Bxf5 Rxf1+ 27.Qxf1 exf5 28.Qe1 Qc6 29.Be5 [-10.88 Fritz 7: 29.Bd6 Nxc3 30.Qe6+ Kh8 31.Qf7 h6 32.Qf8+ Kh7 33.h3 Qe4 34.Kh2 Be5+ 35.g3 Bxd6 36.Qxd6 -6.62/11 ] 29...Qe8-+ 0-1
Chess games are never won! Chess games may only be lost!
posted by Montse at 11:49 PM
![]()


1 Comments:
"Hit me with your rythm stick..hit me hit me hit meeee!" BY Ian Durry ( flip side of the S&D&R&R fame) ;)
Post a Comment
<< Home