Basic pawn endings: blocked pawns 4 - no rook pawns
2. Both kings are on opposite sides of the blocked pawns separated by one file.(file 2)
-c- both kings are on non-critical squares

diagram 1
Both kings are on non-critical squares.
For instance white to play
It takes two moves for white to the green square (see previous posts), one move for black to the green square at his side. Black needs (7-5)2 moves to the opposition square. His distance to the pawn (4-2=2) is the same as white (4-2=2). White can take two roads two the green square. Either he plays 1Ke5 or 1Kf5. If he plays 1 Ke5 this would be a large mistake coz than the defending King will win your pawn and the game. See exceptional position (turtle position). Going with your king to the green square through 1Kf5 is important coz in this way you can attack his pawn two times while on the second time you attack and defend your own pawn. On the contrary the defending king only has one square to attack the enemy pawn and to defend his own pawn.
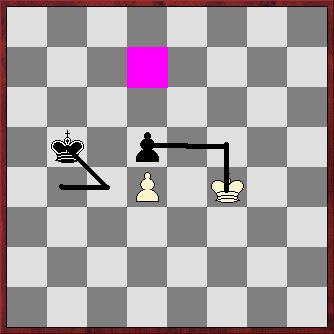
the wrong defense after 1Kf5

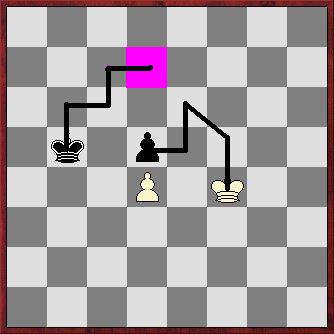
the right defense after 1Kf5

You only go to the opposition square the move following the capturing of the pawn. Then you take opposition and you go draw the game out. No Qeeuning possible unless you make a mistake.
3. Both Kings are on opposite sides of the blocked pawns separated by 2 files.(file 3)
-a- both kings are on critiqual squares
-b- one king is on critical square, the other on a non-critical square
-c- both kings are on non-critical squares
The outcome of the three possibilities are the same - draw by correct defense
Both kings are located within the same distance from the pawns! (7-4; 4-1 both 3)
Both kings have the same distance to the green squares; Black 2 moves and white 2 moves.
So what is the difference between the blocked pawns where the kings are on critical squares separated by 2 files and the pos separated by one file?
In the latter it only takes white one move to reach the green square while black needs 2 square to reach the corresponding green square. If he defends the pawn directly, he is the rabbit king in our turtle position. Now didn't I tell you that being slow pays.
In the former (2-file), both kings needs 2 moves to their respective green squares.
So if you go from 2 files separated to 1 file as attacker, go through the critical square.You never know if the defender makes a mistake.
As defender, do not play on 1Kf5 Kb4 but Kb5! and then you draw.
so some diagrams


Summary: Kings on a same distance from the pawn!
1.Kings beside pawn - turtle pos: Whoever moves first looses.
2.Kings separated by 1 file from blocked pawn position
A. Both kings on critical squares: Whoever moves first wins
B. One king or no kings on critical sqaures: draw no matter whose turn it is.
3.Kings separated by 2 files
Always a draw by correct defense.
Easy as one two three!
Just one remark - Be aware of blocked pawns on the 5/6th rank as defender coz if you loose your pawn, you loose the game. (Opposition does not count)
-c- both kings are on non-critical squares
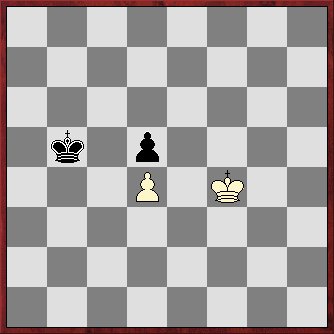
diagram 1
Both kings are on non-critical squares.
For instance white to play
It takes two moves for white to the green square (see previous posts), one move for black to the green square at his side. Black needs (7-5)2 moves to the opposition square. His distance to the pawn (4-2=2) is the same as white (4-2=2). White can take two roads two the green square. Either he plays 1Ke5 or 1Kf5. If he plays 1 Ke5 this would be a large mistake coz than the defending King will win your pawn and the game. See exceptional position (turtle position). Going with your king to the green square through 1Kf5 is important coz in this way you can attack his pawn two times while on the second time you attack and defend your own pawn. On the contrary the defending king only has one square to attack the enemy pawn and to defend his own pawn.
the wrong defense after 1Kf5
the right defense after 1Kf5
You only go to the opposition square the move following the capturing of the pawn. Then you take opposition and you go draw the game out. No Qeeuning possible unless you make a mistake.
3. Both Kings are on opposite sides of the blocked pawns separated by 2 files.(file 3)
-a- both kings are on critiqual squares
-b- one king is on critical square, the other on a non-critical square
-c- both kings are on non-critical squares
The outcome of the three possibilities are the same - draw by correct defense
Both kings are located within the same distance from the pawns! (7-4; 4-1 both 3)
Both kings have the same distance to the green squares; Black 2 moves and white 2 moves.
So what is the difference between the blocked pawns where the kings are on critical squares separated by 2 files and the pos separated by one file?
In the latter it only takes white one move to reach the green square while black needs 2 square to reach the corresponding green square. If he defends the pawn directly, he is the rabbit king in our turtle position. Now didn't I tell you that being slow pays.
In the former (2-file), both kings needs 2 moves to their respective green squares.
So if you go from 2 files separated to 1 file as attacker, go through the critical square.You never know if the defender makes a mistake.
As defender, do not play on 1Kf5 Kb4 but Kb5! and then you draw.
so some diagrams
Summary: Kings on a same distance from the pawn!
1.Kings beside pawn - turtle pos: Whoever moves first looses.
2.Kings separated by 1 file from blocked pawn position
A. Both kings on critical squares: Whoever moves first wins
B. One king or no kings on critical sqaures: draw no matter whose turn it is.
3.Kings separated by 2 files
Always a draw by correct defense.
Easy as one two three!
Just one remark - Be aware of blocked pawns on the 5/6th rank as defender coz if you loose your pawn, you loose the game. (Opposition does not count)
posted by Montse at 12:03 PM
![]()

1 Comments:
Very clear!
Post a Comment
<< Home