Basic pawn endings: blocked pawns 1 - no rook pawns
I decided to help temposchlucker on the section of pawn endgames. Personally I think he took a great initiative to raise the issue and indeed correspondence squares is not a easy matter.
Secondly I need to refresh the matter anyway, coz my grey cells starts to loose its capacity to retain what it had seen in the past.
As the blogg only allows 5 diagrams to be loaded, I will be forced to publish a lot of posts to complete the subject - May "Caissa" be with me or I will be doomed as Crashnik.
First, 5 diagrams
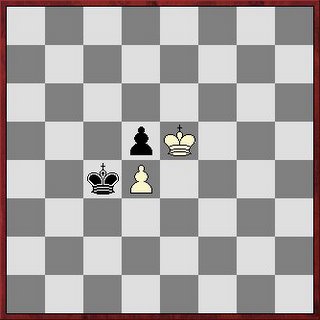
Diagram 1
Whoever moves first, looses the pawn and the game!!

Diagram 2
Win - The one who moves first wins the pawn and the game
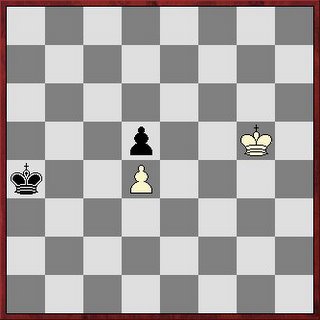
Diagram 3
Draw - The one who moves first wins the pawn but NOT the game
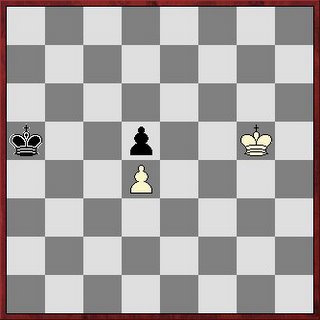
Diagram 4
Draw - The one who moves first wins the pawn but NOT the game
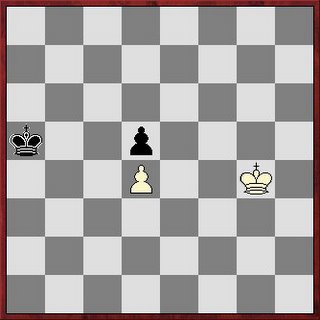
Diagram 5
Draw - The one who moves first wins the pawn but NOT the game
So there are basically 2 questions in these positions:
1. Can I win the pawn?
2. Can I win the game?
The first question is related to the critical squares of the blocked pawns and the position of both kings.
The second question is related to the fact whether the defending king can obtain the opposition immediately after the capture of its pawn by the attacking king and therefor be able to prevent the enemy pawn to queen.
An important item is the ranks on which the blockaded pawns are standing. A blockade on the 4/5 rank leads to a draw while a blockade on the 5/6 rank leads to a win. If the position can be reduced to K+P versus K position with a king in front of the pawn on the 6th rang than opposition doesn't matter anymore. It is always a win.
In diagrams 2-5 the defending king has two options either counter-attack against the enemy pawn or take the defensive approach and go for the opposition.
The attacking king will try to reduce the position to a winning K+P versus K position. Only positions K+P versus K where the opposition doesn't play any role anymore are forcing winning positions, the others can only be won by a mistake made by your opponent.
Going to the next post coz I need images to be uploaded, I explain what critical squares are and than we can handle the diagrams.
Secondly I need to refresh the matter anyway, coz my grey cells starts to loose its capacity to retain what it had seen in the past.
As the blogg only allows 5 diagrams to be loaded, I will be forced to publish a lot of posts to complete the subject - May "Caissa" be with me or I will be doomed as Crashnik.
First, 5 diagrams
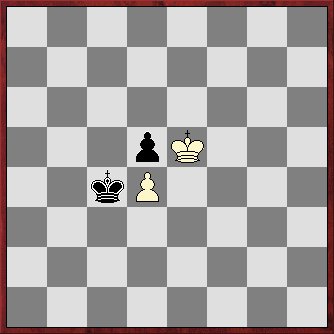
Diagram 1
Whoever moves first, looses the pawn and the game!!

Diagram 2
Win - The one who moves first wins the pawn and the game

Diagram 3
Draw - The one who moves first wins the pawn but NOT the game
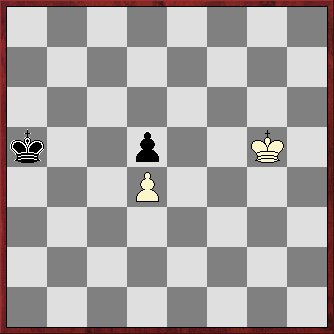
Diagram 4
Draw - The one who moves first wins the pawn but NOT the game

Diagram 5
Draw - The one who moves first wins the pawn but NOT the game
So there are basically 2 questions in these positions:
1. Can I win the pawn?
2. Can I win the game?
The first question is related to the critical squares of the blocked pawns and the position of both kings.
The second question is related to the fact whether the defending king can obtain the opposition immediately after the capture of its pawn by the attacking king and therefor be able to prevent the enemy pawn to queen.
An important item is the ranks on which the blockaded pawns are standing. A blockade on the 4/5 rank leads to a draw while a blockade on the 5/6 rank leads to a win. If the position can be reduced to K+P versus K position with a king in front of the pawn on the 6th rang than opposition doesn't matter anymore. It is always a win.
In diagrams 2-5 the defending king has two options either counter-attack against the enemy pawn or take the defensive approach and go for the opposition.
The attacking king will try to reduce the position to a winning K+P versus K position. Only positions K+P versus K where the opposition doesn't play any role anymore are forcing winning positions, the others can only be won by a mistake made by your opponent.
Going to the next post coz I need images to be uploaded, I explain what critical squares are and than we can handle the diagrams.
posted by Montse at 4:11 AM
![]()


1 Comments:
Hey, nice! I look forward to reading through all these. An excellent resource.
Post a Comment
<< Home